The Auto Updater is a separate component that you'll need to download and install.(See Auto Updater.)
You only need to install the Auto Updater the first time you want to use it. After that, the Auto Updater will automatically update as it updates the endpoints according to the Endpoint Update Polices you define. (See Endpoint Update Policies.)
It is recommended that you install and use the Auto Updater component and endpoint update policies for all agent installations.
To install the Auto Updater on multiple endpoints using SCCM or similar application, see Windows Auto Updater Automated Installation
If you want to install agents without the Auto Updater, see Windows Agent / Bundle Installation.
Prerequisites:
-
Windows Management Instrumentation (WMI) must be enabled.
-
You must Enable Endpoint Update in the Advanced Settings area of the Agent Realm.
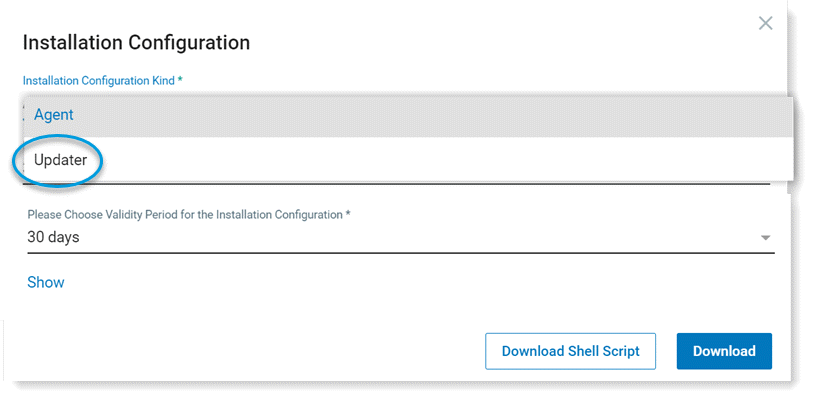
- You must complete Installation Configuration File for Windows Installation. Make sure you select Updater when you download the file You will need the name and location of the file to continue the installation.
Make sure the configuration file you downloaded from the Agent Realm is associated with the Auto Updater.

(See Installation Configuration File.) -
For Dynamic Proxy:
It might take time for the Windows operating system to read changes to PAC file content or when a new or different PAC file is used. Restarting the endpoint will apply those changes immediately.
-
Dynamic Proxy requires that Proxy Auto-Configuration (PAC) resides on an accessible Web server.
-
This feature is based on proxy settings defined at the Operating System level. The Operating System must be configured to use dynamic proxy for applications running under the System account (not the user account). In order to set it or to find out if it’s already set you can run the following commands as Administrator in CMD or Powershell:
To set it:
-
bitsadmin /util /setieproxy localsystem AUTOSCRIPT http://test.com/proxy.pac
To find out if it’s already set:
bitsadmin /util /getieproxy localsystem
-
-
You can install using a Master Image for Windows Agents. (See Windows Agent and Auto Updater VMs and VDI Support.)
After you install the Updater, open the registry (regedit.exe) and delete the following key: Computer\HKEY_LOCAL_MACHINE\SOFTWARE\Windows Client Utility\Updater Utility\Updater
Right-click the key and select Delete.
Downloading the Windows Auto Updater Installation Files
-
From Proofpoint Data Security & Posture, select the Administration app. Select Endpoints > Downloads.
-
From the Downloads list, select the stable version of the Auto Updater, for example winupdater-1.3.0.13 and click Download.

-
Save the downloaded .zip file locally.
-
When you extract the contents of the .zip file, you'll have the following files:
-
UpdaterSetup--<version>.msi: Setup file
- SaasUpdaterSetupInstall.cmd: Silent installation file
-

Installing the Auto Updater for Windows using the Wizard
You can install the agent using the Installation wizard. The wizard installs the Client Utility module.
-
From the files you extracted, run UpdaterSetup--<version>.msi and the wizard opens.
-
Click Next and accept the license agreement. Click Next.
-
If you are using proxy, select the proxy type.
Static Proxy: Provide the Proxy Server Hostname and Port
If using a Proxy server, make sure it is set up and you have connectivity to it.
Dynamic Proxy: No further settings are required. For this option, you must preconfigure a PAC file, as described in the prerequisites.
You can optionally set Authentication Credentials by checking Use authentication credentials and completing the Username and Password fields.
Click Next.
-
For all installations, enter the location for:
- Installation folder: this is the location where you want to install the Updater Utility module.
- Installation configuration folder: this is the config.json file you previously downloaded from Agent Realms and saved locally.
Make sure the configuration file you downloaded from the Agent Realm is associated with the Auto Updater.
(See Installation Configuration File.) - Make sure you select Updater when you download the file You will need the name and location of the file to continue the installation.
-
If you are using a master image, select Install for a master image. For more information, see Windows Agent and Auto Updater VMs and VDI Support.
Click Next.
-
Click Install.
The Updater Utility Setup runs and when complete a success message displays. Click Finish.
Installing the Auto Updater for Windows from the Command Line
You can install the Updater by running SaasUpdaterSetupInstall.cmd as administrator.
-
Open SaasUpdaterSetupInstall.cmd with a text editor.
msiexec /i "%~dp0UpdaterSetup-<Version>.msi" INSTALLDIR="%ProgramW6432%\Windows Client Utility\Updater Utility" /quiet /norestart PRECONFIGPATH="<path_to_pre_config_file>" /leo "%~dp0Windows_Updater_Utility_setup.txt" -
Define the parameters below for your installation:
Parameters
-
INSTALLDIR: Specifies the installation directory you are using
-
PRECONFIGPATH: Specifies the full path for the Pre-Configuration file downloaded from the server, for example <config>.json
-
ITX_MSTR_IMAGE: If set to True, install as Master image (default is false)
-
ARPSYSTEMCOMPONENT: If set to 1, the SaaS Updater Utility is hidden from the Add/Remove window in Control Panel
Proxy Settings
CopyPROXY_TYPE=0 No proxy (default)
PROXY_TYPE=1 Static proxy
PROXY_TYPE=2 Dynamic proxy
PROXY_HOSTNAME="<URL/IP>" *Mandatory if static proxy selected (PROXY_TYPE=1)
PROXY_PORT="<Proxy Port>" *Mandatory if static proxy selected (PROXY_TYPE=1)
PROXY_AUTH_CREDENTIALS=1 to use authentication credentials
PROXY_DOMAIN="<Domain Login>" (Optional)
PROXY_USERNAME="<Proxy Username>" *Mandatory if authentication credentials is on (PROXY_AUTH_CREDENTIALS=1)
PROXY_PASSWORD="<Proxy Password>" *Mandatory if authentication credentials is on (PROXY_AUTH_CREDENTIALS=1) -
-
Left-click SaasUpdaterSetupInstall.cmd and select Run as administrator.
Related Topics: