From the Rules page, you can set up and manage CASB detection and remediation rules. The page lists all rules and provides controls for rule administration.
Cloud Rule Categories
Cloud rules are divided into four category types:
Access Rules are the first line of defense in protecting against cloud account takeover.
-
They can detect, alert, and remediate on login activity made to cloud applications.
-
These rules relate to login activity to cloud applications, including suspicious logins (automatic threat detection)
Data Rules help prevent unwanted or unauthorized data sharing.
-
They can detect, alert, and remediate on file activity in your cloud applications, such as anomalous file activity, which may indicate an insider threat.
-
These rules relate to file activities in cloud applications (e.g. file upload, file download, and file share actions.
App Governance Rules help prevent threat actors from accessing your environment by leveraging malicious, abused, or vulnerable apps.
-
They can detect, alert, and remediate.
-
These rules relate to relate to 3rd party OAuth applications.
Configuration and Security Posture rules monitor your cloud app and cloud email configurations.
These rules are for SaaS compliance and/or security posture activities.
Rules Page
Accessing the Rules Page
From the Administration app, select, Cloud > Cloud Rules, the Rules page lists all existing rules and provides controls for rule administration.
Each rule type is associated with a specific resource (the entity that is queried when determining if an event should trigger a rule.) For example, the resource for an App Governance rule is an application. The resource for a Data rule are typically files but could also be a file repository. Access Rules are dedicated to connected app logins.

Depending on a user's assigned access permissions, the main page will either display information either in a read only format or will provide administrative controls. See Assigning Access Policies for more details.
For each rule, the main page shows key information is shown to help you understand what each rule does. For example, you can see which cloud apps a rule monitors, the activity type its designed for, and any remediation actions the rule performs if it triggers. For each defined rule, the main page shows these primary attributes:
-
Name: A descriptive name that typically explains the rule's purpose.
-
Severity: Shows how risky the activity associated with the rule is for your organization
-
Applications: All connected apps governed by the rule
-
Activity Type: The event(s) governed by the rule
-
Remediation Actions: The automatic defensive responses to the rule being triggered
-
Notify: Indicates if email notifications are sent on alert generation, and to who
-
Status: Indicates if the rule is operational or disabled
-
Options menu: Provides controls for the following: Edit, Duplicate, Delete, Export, and View detail
Clicking on any rule listed on the main page will open a Side Panel that displays details of the rule and lets you Edit, Duplicate, Delete and Export the selected rule.
-
Rule Name: A descriptive name that typically explains the rule's purpose.
-
Severity: Shows how risky the activity associated with the rule is for your organization
-
Applications: All connected apps governed by the rule
-
Activity Type: The event(s) governed by the rule
-
Remediation Actions: The automatic defensive responses to the rule being triggered
-
Notify: Indicates if email notifications are sent on alert generation, and to who
-
Status: Indicates if the rule is operational or disabled
-
Options menu: Provides controls for the following: Edit, Duplicate, Delete, Export, and View detail
Side Panel
Clicking on any rule listed on the main page will open a Side Panel that displays details of the rule and lets you Edit, Duplicate, Delete and Export the selected rule. (See Side Panel View.)
Search and Filter Rules
In addition to the features listed above, the main page is where you can:
-
Search Rules
-
Filter Rules
-
Enable/Disable a Rule
-
Using a Rule’s Options Menu (Edit, Duplicate, Delete, Export, and View Details)
-
Change Rule Priority
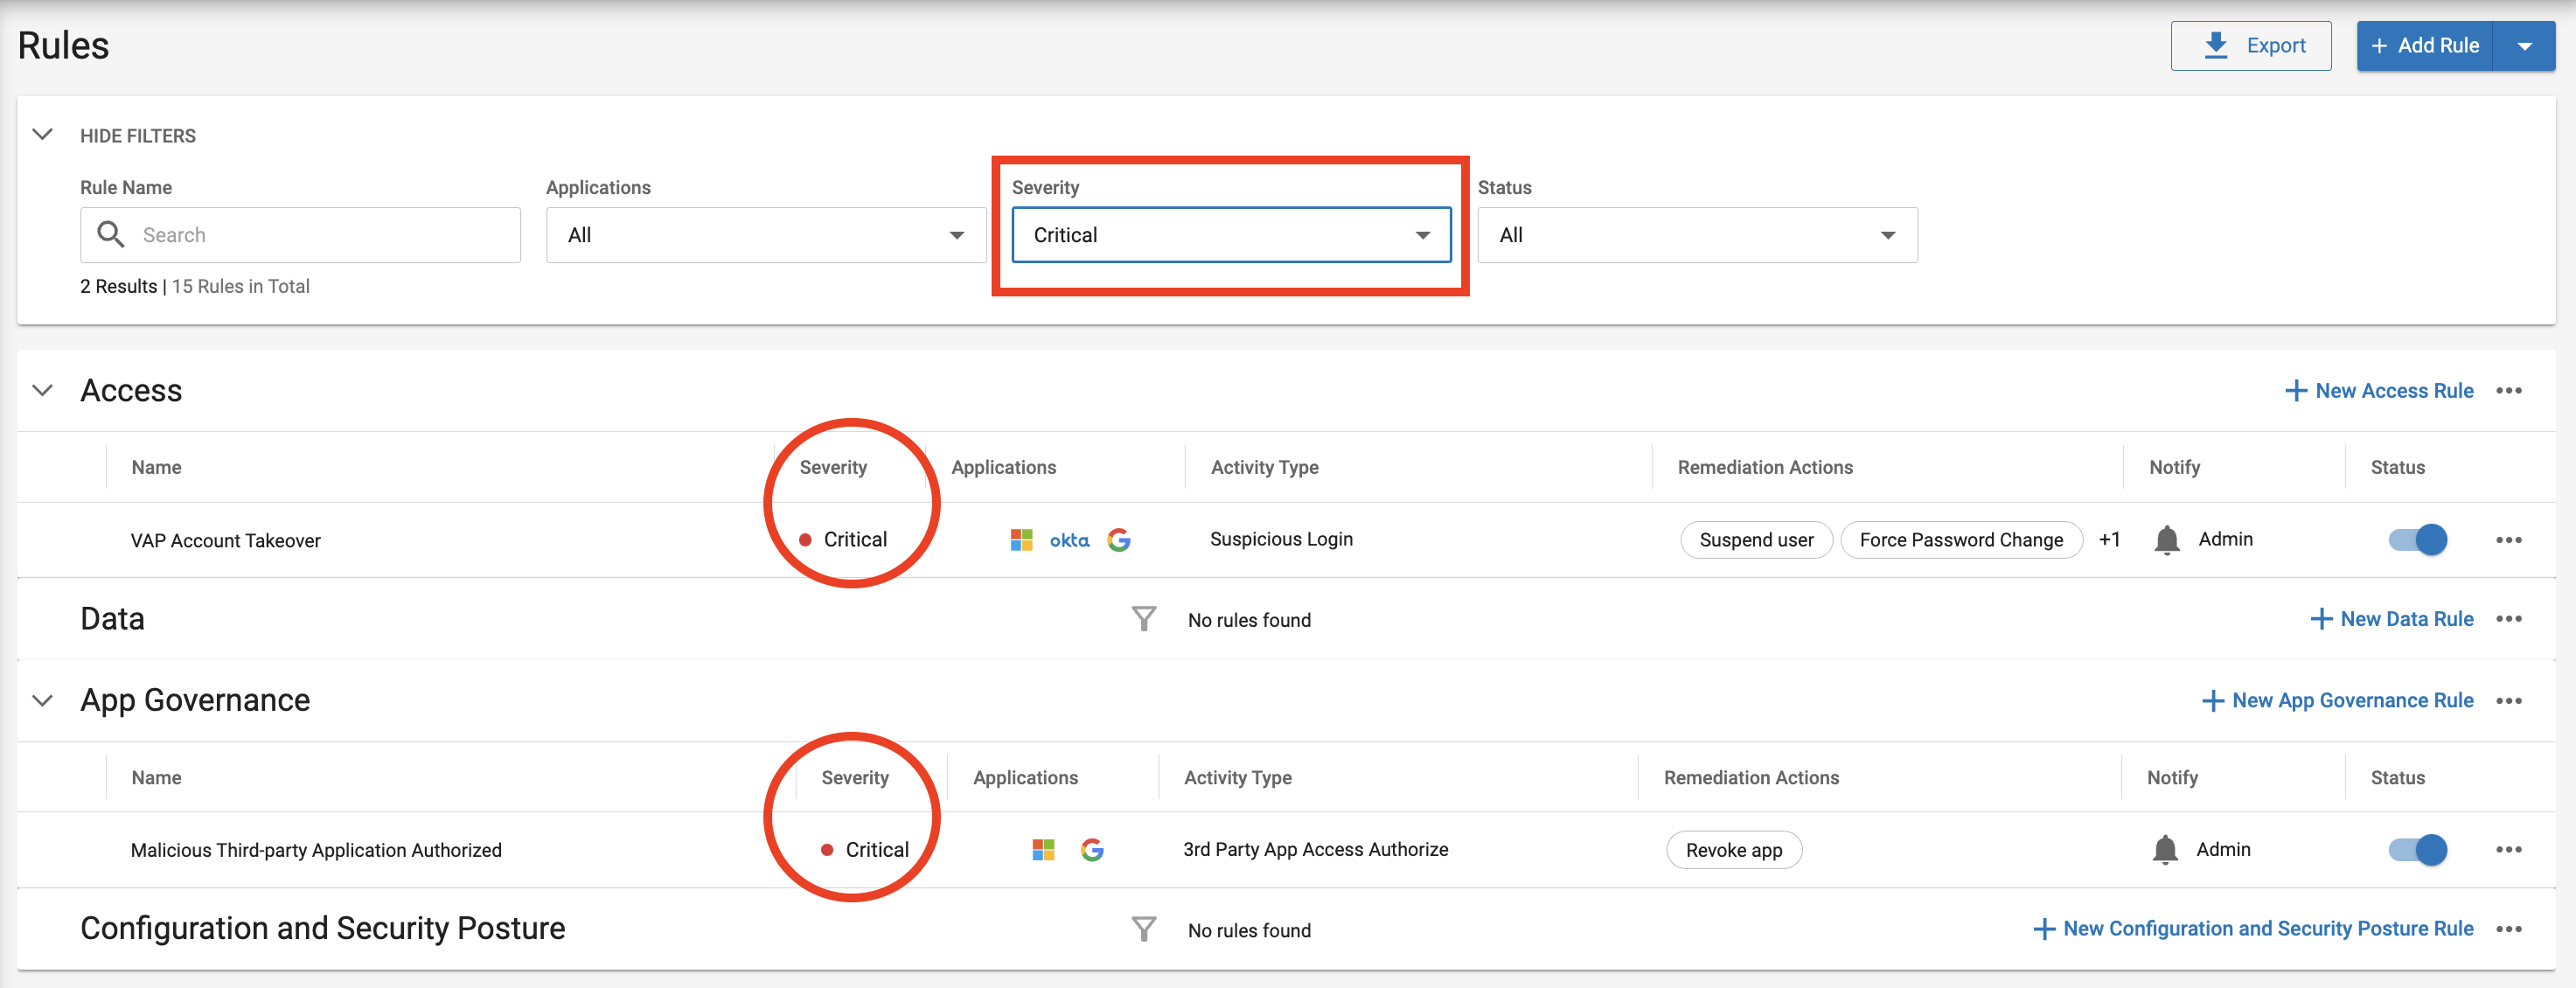
The main rule page allows you to search and filter the list of rules so you can easily find the rules that are relevant for you and update them.
-
Use the Rule Name search box to filter by specific words contained in rule names.
-
Use the drop down menus to filter by specific Applications, Alert Severity, and Rule Status.
-
The Results Indicator counts the number of rules displayed vs the total number of existing rules. For example, if you enter the terms “VAP” into the search field, the results indicator may show the following: 2 Results | 57 Rules in Total.
For a rule to display on the main page, the rule configurations must match all current filtering options. Drop down menu filters match all by default. Filter options will remain until you reset them.
Search by Rule Name
1. Enter terms in the Rule Name search box.
2. Only rules with matching terms in their names will display.
Filter by Application, Severity, or Status
1. Click on one or more drop down menus: Applications, Severity, or Status.
2. Check items you wish to filter by.
3. Only rules with matching configurations will display.
Rule Status
Each rule on the main page has a control that will enable/disable it status. This allows you to suspend an active rule without having to delete it. When disabled, a rule remains listed on the main page according to its priority ranking, but it will not trigger any alerts.
A rule’s Status determines if it is operational. Newly added rules are enabled by default. You can enable or disable a rule’s status at any time. Rules can be edited in a disabled or enabled state.
-
Use the Status switch on the main page to enable/disable a rule.
-
Disabled Rules - If a rule’s status is Disabled, the system does not evaluate or apply the rule.
-
Enabled Rules - If a rule’s status is Enabled, the rule is fully operational and will trigger for matching events.
Enable/Disable a Rule
1. Find the rule whose status you want to edit.
2. Click the rule’s Status Toggle to either enable or disable it.

Side Panel View
Complete configurations (in read-only mode) for a rule can be viewed from the main page in a side panel.
The side panel view can help you understand what the rule does without having to open in edit mode and shows you information on when a rule was last added/modified.
The side panel also provides < > controls that will advance to View Details for the previous or next listed rule, as well as all controls found in a rule’s options menu.
Open a Rule in the Side Panel
-
On the main page, click any Rule.
-
The side panel will display full configurations for the selected rule.

Side Panel Description
Last Modified information displays and helps you to track rule changes and engage with the administrator responsible for them.

The Side Panel includes the following sections:
-
General: Provides a description of the rule and the rule category.
-
Condition: Shows under what conditions the rule will apply. Describes the applications, activity types and context of the rule. It also includes the risk level attributes.
-
Response: Shows the alert severity; as well as any specified remediations and notifications.
Using a Rule’s Options Menu
Each rule has an options menu with controls to: Edit, Duplicate, Delete, Export, and View Details:

Edit a Rule
You can edit an existing rule to modify its settings. After you save edits, only the new settings are effective.
-
In a rule’s options menu, click Edit.
-
The rule will open in the rule editor's > edit mode.
-
Make any necessary modifications in the rule editor.
Click Save when done.
-
Consider if the Rule’s ranking needs to be changed. If it does, raise or lower the ranking by following the instructions for Change Rule Priority.
-
For complete details on using the rule editor, visit the Define a Cloud DLP Rule page.
Duplicate a Rule
You can save configuration time when there is an existing rule similar to the rule you need to add. Duplicate the existing rule, edit its settings, then save it as a new rule.
-
In a rule’s options menu, click Duplicate.
-
A copy of the rule will open in the rule editor.
-
Make all necessary edits in the rule editor.
Click Save when done.
-
Consider if the Rule’s ranking needs to be changed. If it does, raise or lower the ranking by following the instructions for Change Rule Priority.
-
For complete details on using the rule editor, visit the Define a Cloud DLP Rule page.
Delete a Rule
-
In a rule’s options menu, click Delete.
-
A confirmation window display. Click Delete.
The rule is removed and erased from the tenant.
Deleted rules cannot be recovered
Export a Single Rule
-
In a rule’s options menu, click Export.
-
The system will automatically download a json file of the rule’s configurations.
View Details
-
In a rule’s options menu, click View Details.
-
Complete rule configurations will display in the Side Panel.
You can use the side panel’s < > controls to move to the previous or next listed rule
Change Rule Priority
On the main page, rules within each category (Access, Data, App Gov…) are stack-ranked and applied by the system based on priority. When an event occurs, CASB detects the event details, then performs a prioritized evaluation (from top to bottom) of each rule within the rule category related to the event type.
All matching rules fire according to priority until the system enforces a matching rule with defined remediation action(s).
You can change a rule’s priority, so it is evaluated before other rules in the same category. Rules can only be reordered in their own category. To reorder rules, you will put the section into Reorder Mode, then use drag-and-drop controls to establish desired rule rankings. Commit changes only after you have established the desired priority.
Reminder: When setting priority, be sure that rules designed to detect the most serious threats are above rules designed to detect less serious threats.
Reorder Rules
On the main rule page, click on any rule to drag and re-order it.
-
Click on the rule you want to re-order and begin dragging it.
-

-
The rule category section is now Reorder mode.
-

-
Raise or lower the rule until the desired priority is set.
-
When done, click Apply.


Export and Import Rules
Visit theExport and Import Rules page for complete instructions on how to export and import rule configurations.
Rule Templates
The preconfigured rule templates help you quickly establish all recommended policies.
To view complete rule template configurations, click on any template and its full configurations will display. These detailed settings allow you to understand what the rule template does without having to open in edit mode.
You can filter the template view.