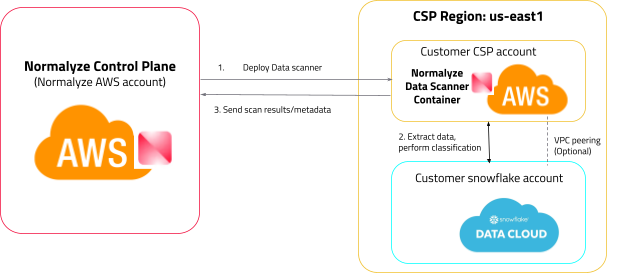
Snowflake Data Scan Architecture
To enable data scanning in Snowflake, we need to deploy serverless functions into customer environments that can access the data store and perform the scan. In the case of AWS, we deploy AWS Lambda functions for scanning resources. However, Snowflake cloud does not allow the deployment of dataplane components by external entities.
To overcome this limitation, we use a sidecar-like architecture by leveraging a customer-owned AWS account as a sidecar to the Snowflake account. This enables the deployment of the DSPM scanner, which can then access the Snowflake data and perform the necessary scans. This approach ensures that data scanning in Snowflake is possible even when direct deployment of DSPM scanner components are not supported.
Follow these three main steps to Onboard your Snowflake account to DSPM:
-
Snowflake Account Configuration
An active Snowflake account which would be onboarded for data discovery and risk detection.
-
Sidecar AWS Account Configuration
As Snowflake is a SaaS application, DSPM cannot deploy the stack and create the necessary resources on it directly. This necessitates for a sidecar AWS account on which resources are created which then connects to Snowflake using AWS secret mechanism.
This AWS account should be onboarded on the DSPM platform before the Snowflake account is onboarded. For details, see Amazon Web Services (AWS) Onboarding.
- Onboard Snowflake to DSPM
The above steps on how to Onboard Snowflake to DSPM are fully outlined below.
Step 1: Snowflake Account Configuration
To enable DSPM to scan and classify data in Snowflake, you may need to create a new user account for DSPM to use.
While an administrator user account has more privileges and permissions, it is recommended to create a regular user account for DSPM to ensure proper scope and security considerations. Regular users have limited permissions and cannot modify account settings, but they have access to objects and data once they have been granted explicit permission.
It is essential to ensure that the user created for DSPM has access to all the databases that the customer plans to scan; DSPM can only scan and provide visibility to the databases that the user role can see (this is based on the RBAC structure that Snowflake has in place) . By creating a regular user account with appropriate access, customers can enable DSPM to accurately scan and classify data within Snowflake.
Create a Key-pair to be used by the DSPM service account in Snowflake
-
Generate an unencrypted private key.
openssl genrsa 2048 | openssl pkcs8 -topk8 -inform PEM -out rsa_key.p8 -nocrypt
-
Generate a public key from the private key.
openssl rsa -in rsa_key.p8 -pubout -out rsa_key.pub
Reference:
https://docs.snowflake.com/en/user-guide/key-pair-auth#generate-a-public-key
The key pair being setup must be unencrypted.
Create a user and role for NORMALYZE
--Step 1: Create a role
CREATE ROLE NORMALYZEROLE;

--Step 2: Create Warehouse (optional) - Can use existing Warehouse
CREATE WAREHOUSE <Name of the WH>;

--Step 3: Create User and assign default role and default warehouse
CREATE USER NORMALYZE DEFAULT_ROLE = 'NORMALYZEROLE' DEFAULT_WAREHOUSE = <WAREHOUSE NAME> TYPE = SERVICE;

--Step 4:Grant role to user
GRANT ROLE NORMALYZEROLE TO USER NORMALYZE;

--Step 5: Grant usage on the warehouse to the role
GRANT USAGE ON WAREHOUSE <WAREHOUSE NAME> TO ROLE NORMALYZEROLE;

--Step 6: User credential authentication mechanism:

--Use key-pair authentication (recommended)
ALTER USER NORMALYZE SET rsa_public_key='abc..';

--or

-- Use password-based authentication (not recommended by Snowflake)
ALTER USER NORMALYZE SET PASSWORD = 'SomethingSecret';
Verify Login
Verify using SnowSql or any utility to confirm that the user is able to login with the key pair authentication mechanism. The details to test it are provided here:
https://docs.snowflake.com/en/user-guide/key-pair-auth#configure-the-snowflake-client-to-use-key-pair-authentication
Eg: using snowsql use the following command to test the authentication and connectivity:
snowsql -a <snowflake account identifier> -u <username which is configured for key pair - Step 3> --private-key-path <path where the private key is stored> This will confirm that the key pair is configured correctly and the user is able to authenticate with it.
For Migrating Existing Snowflake Implementations with DSPM using Username and Password Based Authentication to Key-Pair Based Authentication
Do you already have the Snowflake <> DSPM integration setup and are looking to move from Username/Password based authentication to Key-Pair based authentication?
Snowflake’s latest recommendation for Service Accounts used for integration with external applications stats that you should use a secure authentication mechanism such as Key-Pair authentication, username/password based authentication. For existing service accounts that are using username/password based authentication, please follow the steps to move to using Key-Pair mechanism.
-- Alter existing user type to SERVICE
ALTER USER NORMALYZE SET TYPE = SERVICE;
Reference Snowflakes documentation for the new parameter TYPE: https://docs.snowflake.com/en/sql-reference/sql/create-user
After altering the user TYPE parameter, follow the steps to create the key-pair and the steps for adding it to the AWS Secret Manager.
Grant Access Control Privileges
--Step 1: Grant Access Control Privileges
GRANT MONITOR EXECUTION ON ACCOUNT TO ROLE NORMALYZEROLE;

GRANT IMPORTED PRIVILEGES ON DATABASE SNOWFLAKE TO ROLE NORMALYZEROLE;

GRANT MANAGE GRANTS ON ACCOUNT TO ROLE NORMALYZEROLE;
Why do the following privileges have to be assigned to the NORMALYZE role?
1. IMPORTED PRIVILEGES - DSPM platform leverages the SNOWFLAKE database to scan for the basic details like the Database size, Failsafe storage size, etc. And since SNOWFLAKE is a shared db, it needs the privilege to query the objects in it. For more details, please review the Snowflake documentation.
2. MANAGE GRANTS - DSPM platform uses system functions like “SHOW USERS” to get the user information from the account which is onboarded. And the above function can be run only by a role that has ‘MANAGE GRANTS’ privilege assigned to it.
For more details, please review the Snowflake documentation.
Grant role access to your Data Source
Grant DSPM access to the database(s) that you want to scan using the following Grant statements:
GRANT USAGE ON DATABASE <database_name> TO ROLE NORMALYZEROLE;

GRANT USAGE ON ALL SCHEMAS IN DATABASE <database_name> TO ROLE NORMALYZEROLE;

GRANT USAGE ON FUTURE SCHEMAS IN DATABASE <database_name> TO ROLE NORMALYZEROLE;

GRANT SELECT ON ALL TABLES IN DATABASE <database_name> TO ROLE NORMALYZEROLE;

GRANT SELECT ON FUTURE TABLES IN DATABASE <database_name> TO ROLE NORMALYZEROLE;

GRANT SELECT ON ALL VIEWS IN DATABASE <database_name> TO ROLE NORMALYZEROLE;

GRANT SELECT ON FUTURE VIEWS IN DATABASE <database_name> TO ROLE NORMALYZEROLE;
This step must be repeated for all the databases which you want to scan with DSPM. If the grants are not assigned to any database then DSPM will skip scanning those specific databases and continue with the others where the privileges are granted.
To grant DSPM access to multiple (or all) databases in your Snowflake environment, use the below script. The output of this script will be the set of 5 commands from Step 1 for each of the database on the Snowflake account. The SQL commands can then be executed on the Snowflake environment in batch mode.
-- Define the role to which grants will be given
SET role_name = 'NORMALYZEROLE';

-- Get the list of databases
SELECT database_name
FROM snowflake.account_usage.databases
WHERE database_name NOT IN ('information_schema', 'snowflake', 'snowflake_account')
and DELETED is null and type='STANDARD';

show databases;

-- Loop through each database and generate and execute GRANT statements
CREATE OR REPLACE PROCEDURE grant_permissions()
  RETURNS STRING
  LANGUAGE JAVASCRIPT
  EXECUTE AS CALLER
AS
$$
var role_name = 'NORMALYZEROLE';
var databases = snowflake.createStatement({sqlText: "SELECT DATABASE_NAME FROM snowflake.account_usage.databases WHERE DATABASE_NAME NOT IN ('information_schema', 'snowflake', 'SNOWFLAKE_SAMPLE_DATA') and DELETED is null and type='STANDARD'"}).execute();
var grants = [];

while (databases.next()) {
    var database_name = databases.getColumnValue(1);
    grants.push(`GRANT USAGE ON DATABASE ${database_name} TO ROLE ${role_name};`);
    grants.push(`GRANT USAGE ON ALL SCHEMAS IN DATABASE ${database_name} TO ROLE ${role_name};`);
    grants.push(`GRANT USAGE ON FUTURE SCHEMAS IN DATABASE ${database_name} TO ROLE ${role_name};`);
    grants.push(`GRANT SELECT ON ALL TABLES IN DATABASE ${database_name} TO ROLE ${role_name};`);
    grants.push(`GRANT SELECT ON FUTURE TABLES IN DATABASE ${database_name} TO ROLE ${role_name};`);
}

return grants.join('\n');
$$;

-- Execute the procedure to generate and print the GRANT statements
CALL grant_permissions();
Step 2: Sidecar AWS Account Configuration
Notes:
- This step must to be completed otherwise while onboarding your Snowflake account, the AWS Account in the drop-down field will not be populated with the sidecar account id.
- The AWS account that is used as a sidecar account can be used to connect to Snowflake deployed on AWS, Azure and GCP cloud.
- Ensure this AWS account is onboarded to DSPM prior to moving on to step three.
- Login to the AWS management console and navigate to Secrets Manager.
- Select the option for ‘Store new Secret’
- Under Secret Type - select “Other Type of Secret”
- Under Key / Value Pairs - add the following details:
For Username and Password Based Authentication
username - normalyze
password - <password for the user>
This username and password should be the one created in Step 1: Snowflake Account Configuration.

For Key-Pair Based Authentication
The private key that needs to be added to the AWS Secrets manager has to be formatted using a utility to ensure that the formatting of the key string is not lost. The AWS secrets manager formats the Key string differently and if the processing is not done, the key becomes invalid string. To properly format the Key-Pair, complete the following instructions:
Use the following Python utility to generate the formatted output of the private key.
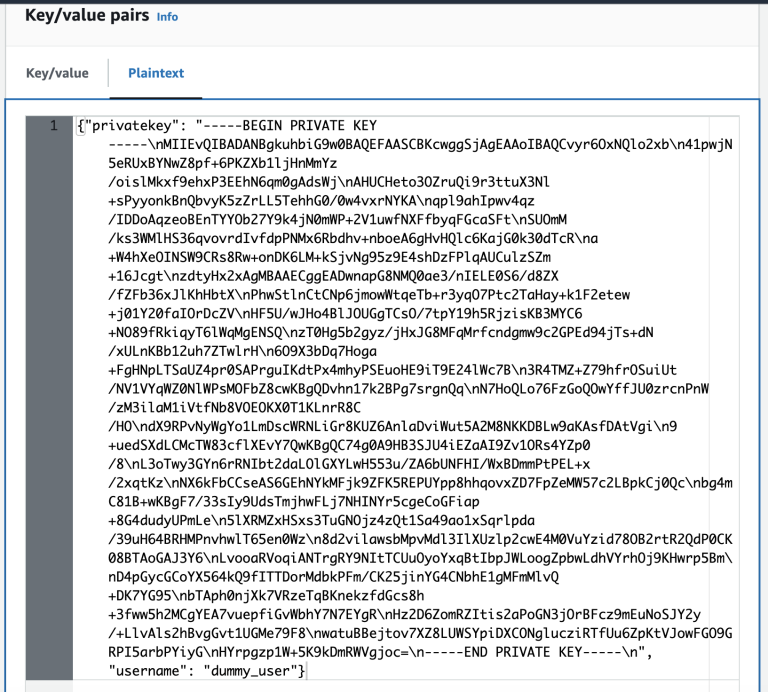
PRIVATE_KEY=<Private_Key filename Step 1>.p8 python -c 'import os; import json; file_handler=open(os.environ.get("PRIVATE_KEY")); data=file_handler.read(); file_handler.close(); print(json.dumps({"privatekey": data, "username": "<username from Step 3>"}))'(optional) Perl equivalent of the above script:
PRIVATE_KEY=<Private_Key filename Step 1>.p8 && privatekey=$(cat $PRIVATE_KEY | perl -e 'chomp(@a=<>); print join ("\\n", @a), "\n"') && printf '\n{"privatekey": "%s", "username": "<username from Step 3>"}\n' "$privatekey"The output returned from the above command will look similar to this:
{"privatekey": "-----BEGIN PRIVATE KEY-----\nMIIEvQIBADANBgkuhbiG9w0BAQEFAASCBKcwggSjAgEAAoIBAQCvyr6OxNQlo2xb\n41pwjN5eRUxBYNwZ8pf+6PKZXb1ljHnMmYz/oislMkxf9ehxP3EEhN6qm0gAdsWj\nAHUCHeto3OZruQi9r3ttuX3Nl+sPyyonkBnQbvyK5zZrLL5TehhG0/0w4vxrNYKA\nqpl9ahIpwv4qz/IDDoAqzeoBEnTYYOb27Y9k4jN0mWP+2V1uwfNXFfbyqFGcaSFt\nSUOmM/ks3WMlHS36qvovrdIvfdpPNMx6Rbdhv+nboeA6gHvHQlc6KajG0k30dTcR\na+W4hXeOINSW9CRs8Rw+onDK6LM+kSjvNg95z9E4shDzFPlqAUCulzSZm+09Jcgt\nzdtyHx5xAgMBAAECggEADwnapG8NMQ0ae3/nIELE0S6/d8ZX/fZFb36xJlKhHbtX\nPhwStlnCtCNp6jmowWtqeTb+r3yqO7Ptc2TaHay+k1F2etew+j01Y20faIOrDcZV\nHF5U/wJHo4BlJOUGgTCsO/5tpY04h5RjzisKB3MYC6+NO89fRkiqyT6lWqMgENSQ\nzT0Hg5b2gyz/jHxJG8MFqMrfcndgmw9c2GPEd94jTs+dN/xULnKBb12uh7ZTwlrH\n6O9X3bDq7Hoga+FgHNpLTSaUZ4pr0SAPrguIKdtPx4mhyPSEuoHE9iT9E24lWc7B\n3R4TMZ+Z79hfrOSuiUt/NV1VYqWZ0NlWPsMOFbZ8cwKBgQDvhn17k2BPg7srgnQq\nN7HoQLo76FzGoQOwYffJU0zrcnPnW/zM3ilaM1iVtfNb8VOEOKX0T1KLnrR8C/HO\ndX9RPvNyWgYo1LmDscWRNLiGr8KUZ6AnlaDviWut5A2M8NKKDBLw9aKAsfDAtVgi\n9+uedSXdLCMcTW83cflXEvY7QwKBgQC74g0A9HB3SJU4iEZaAI9Zv1ORs4YZp0/8\nL3oTwy3GYn6rRNIbt2daLOlGXYLwH553u/ZA6bUNFHI/WxBDmmPtPEL+x/2xqtKz\nNX6kFbCCseAS6GEhNYkMFjk9ZFK5REPUYpp8hhqovxZD7FpZeMW57c2LBpkCj0Qc\nbg4mC81B+wKBgF7/33sIy9UdsTmjhwFLj7NHINYr5cgeCoGFiap+8G4dudyUPmLe\n5lXRMZxHSxs3TuGNOjz4zQt1Sa49ao1xSqrlpda/39uH64BRHMPnvhwlT65en0Wz\n8d2vilawsbMpvMdl3IlXUzlp2cwE4M0VuYzid78OB2rtR2QdP0CK08BTAoGAJ3Y6\nLvooaRVoqiANTrgRY9NItTCUuOyoYxqBtIbpJWLoogZpbwLdhVYrhOj9KHwrp5Bm\nD4pGycGCoYX564kQ9fITTDorMdbkPFm/CK65jinYG4CNbhE1gMFmMlvQ+DK7YG82\nbTAph0njXk7VRzeTqBKnekzfdGcs8h+3fww5h2MCgYEA7vuepfiGvWbhY7N7EYgR\nHz2D6ZomRZItis2aPoGN3jOrBFcz9mEuNoSJY2y/+LlvAls2hBvgGvt1UGMe79F8\nwatuBBejtov7XZ8LUWSYpiDXCONglucziRTfUu6ZpKtVJowFGO9GRPI5arbPYiyG\nHYrpgzp1W+5K9kDmRWVgjoc=\n-----END PRIVATE KEY-----\n", "username": "dummy_user"}Copy the entire output from the above step and paste it under the PlainText section of AWS Secrets Manager.
- Leave the Encryption key to default aws/secretsmanager and select Next.
- Set the name under Secret Name and some details under Description respectively.
-
Under Tags section, set the following values. The case for the key and value has to set up exactly as shown below:
Key - Name
Value - Normalyze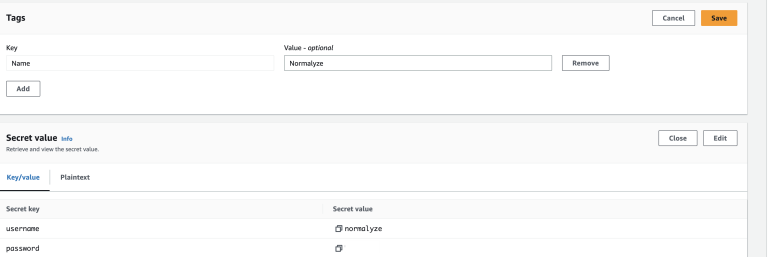
- Leave the other sections with the default values and select Next.
- Select default values for this and the Next section.
- Store the secret.
-
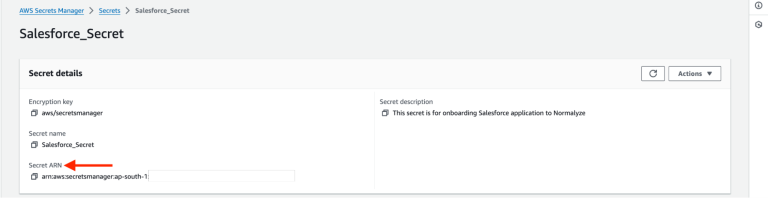
Select the “secret” from the list and copy the Secret ARN value for it. This is the value that will be used for onboarding from the DSPM platform.
Step 3: Onboard Snowflake to DSPM
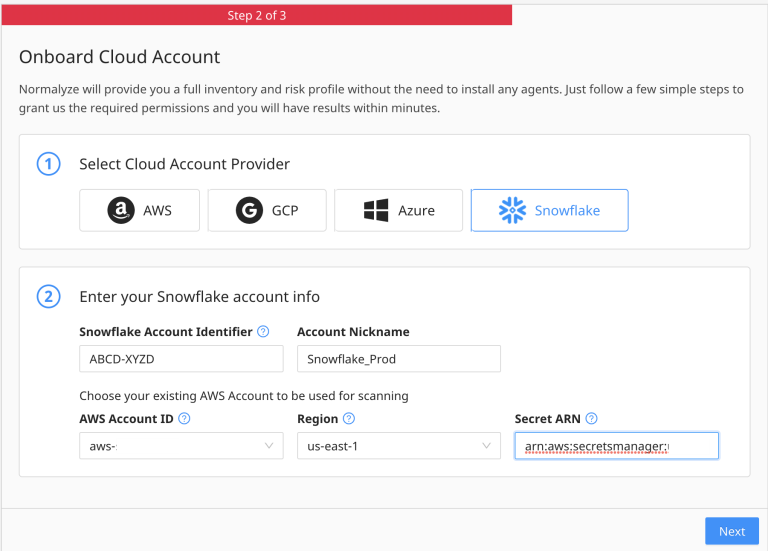
Below are the instructions to Onboard your Snowflake account in the DSPM UI.
- Login to DSPM and go to Workspace on the main menu, then select Accounts.
- Select Onboard Cloud Account.
- Select Snowflake from the options.
- In Snowflake Account Identifier - Enter the Regionless URL for the Snowflake account which the format is <Organization Name>-<Account-Name>
- Set the Account Nickname to a value which would be easy to identify.
- AWS Account ID - Set the value for the AWS account ID that is onboarded and used for configuration of secret from the earlier step.
- Region - Set the value for region where the secret is set up in the earlier steps.
- Secret ARN - Paste the value for ARN copied in Step 11 in Step 2: Sidecar AWS Account Configuration.
- Select Next and with this step onboarding is completed.
On Selecting Next, cloud scan will be triggered automatically and the Snowflake instance will appear in the Data Store page.
Trigger a Data Scan
Snowflake data stores leverage the Secret ARN value provided at the time of the Account Onboarding the account on DSPM as connection for Data Scan operations. So, the user does not have to separately navigate to the data store and set the connection credentials for the Snowflake data stores.
Configure a Scan Schedule to scan the data store :
Navigate to Scan Config > Scan Scheduler > New Schedule. Select Snowflake as the type of Data Store, and select the relevant Snowflake Data Store to scan.
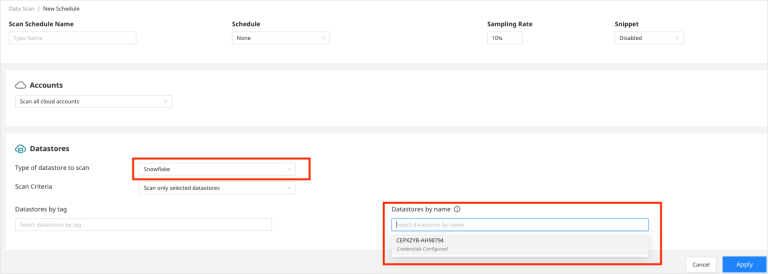
See Scan Scheduler 1.0 and 2.0 for more details on creating a new scan schedule.
Here, the scan configuration will read the Secret associated with the Snowflake account and will use it to connect to it to enable the Data scan operation is able to connect successfully to the account.
Onboarding Complete
Congratulations! You have successfully onboarded a Snowflake account to DSPM and triggered a Data Scan. You can now explore the Access Graph to understand your data access relationships.