Configure scans for your organization
The full Cloud Scan operation to detect data risks - which is triggered either during Account Onboarding or can be triggered manually for existing accounts - is different than Data Scans.
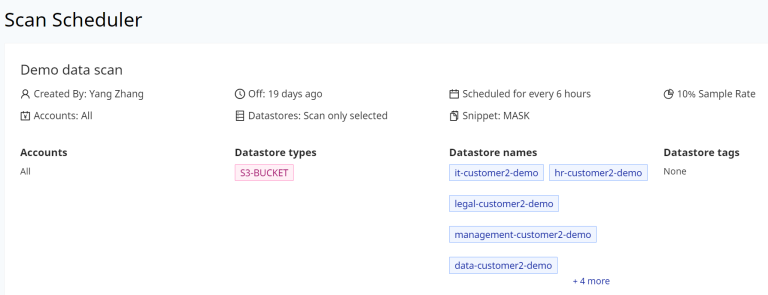
Unlike the Cloud Scan, Data Scan operations are not tick-based and need to be configured on an account/data store basis. They can be run manually or set to run on a scheduled basis.
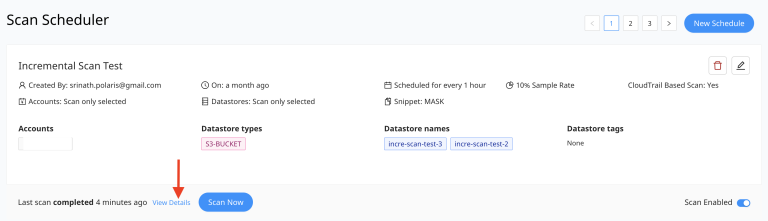
Configuration and set up are done from the Scan Scheduler section.
Along with setting up the Data Scan schedule, there are these additional configurations:
Sampling Rate
This configuration option instructs the data scanning operation to process only a fraction of the number of items from the entire data store. The percentage defined here limits the number of items selected.
Snippet
This configuration instructs the data scanning operation to create a small piece or fragment of data extracted from the larger dataset. Options here are:
- Disabled - No data snippet will be generated
- Full - Snippet generated will show the full set of values for data fragment
- Mask - Snippet generated will obfuscate the critical information
Scan Filters
This section allows administrators to define a subset of the files from the data stores to be scanned during the scheduled run. This is beneficial for scenarios when a specific set of files are the only ones that would be updated or for location based items. The configuration options are as follows:
- Filter by file extension - Use this option to narrow down the list of files based on specific file extensions
- Filter by file path prefix - Use this option to narrow down the list of files based on the path they are stored
- Filter by file last modified time - Use this option to narrow down the list of files based on a specific time period or based on when the files were last scanned
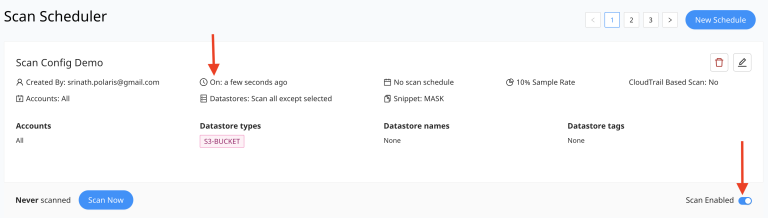
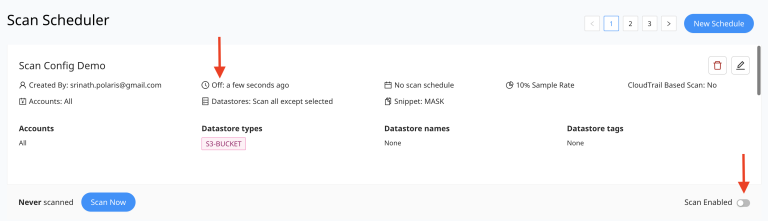
Enable/Disable A Scan
Scans can be disabled as-is by toggling the Scan Enabled button below each of the schedules. This retains the configuration of the schedule and allows these schedules to be re-enabled when the entire scanning operation has been automated.
When the Scan Profile is enabled (toggle to Enabled) it is indicated with "On" displayed besides the Clock icon on profile UI.
When the Scan Profile is disabled (toggle to Disabled) it is indicated with "Off" displayed besides the Clock icon on profile UI.
Trigger A Scan
Once the scheduler is configured, scans can be triggered manually by selecting the Scan Now button.
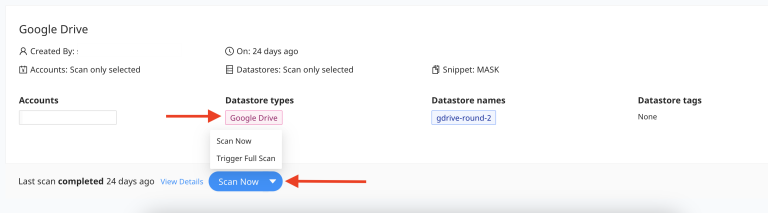
For Scan Profiles specific to SaaS data stores like Google Drive, Microsoft OneDrive and Microsoft Sharepoint there will be 2 options listed which are :
Scan Now
Trigger Full Data Scan
Details for each of these options are as follows:
- Scan Now - On selecting this option, one of the following operations are triggered:
- If the data store is newly configured and is the first time that Data scan is going to be run, then selecting "Scan Now" will trigger a Full Data Scan.
- If the datascan failed in the previous run for any reason, then selecting Scan Now would run the datascan from the point where it failed earlier instead of starting from the beginning.
- If datascan is completed successfully earlier then selecting this option will trigger the operations to do only the post-scan tasks that are necessitated due to configuration changes for scanner database tasks. For eg: if there is a requirement to segregate and classify some of the domains for the users as Internal or External which would then be captured in the corresponding Risk signatures, the domain list has to be marked respectively. Once this is done, selecting "Scan Now" would only be running the operations to classify the files based on the Domain classification and creating the respective risks. It will not be running the Data Scan operation on the files.
- Trigger Full Data Scan - On selecting this option, a Full Data scan is triggered on the data store irrespective of whether the datascan was completed successfully earlier or not.
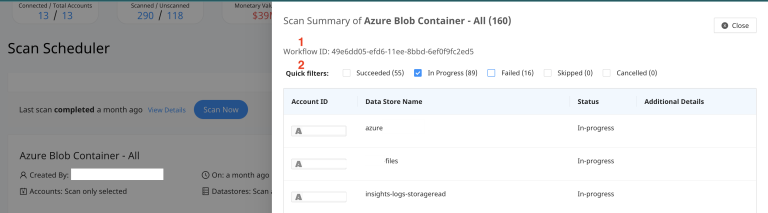
View Scan Details
To review all the data stores that are picked up for scanning and their status, select the View Details option which shows details for each one of them along with the status and corresponding error message in case of a failed run.
Along with it the Details section shows the Workflow Id (marked 1 in the below screenshot)for each of the scan run which can be shared with DSPM team in the event of data scan failures.
Quick Filter option (marked 2 in the below screenshot) is available to list only specific data stores based on the corresponding scan status which makes it easier to get the filterered list of stores.
The next section walks through each option in the Scheduler.