Instructions for mapping MIP Labels to DSPM Data Classification
This beta release is available for select customers.
MIP labels 1.0 are supported for Azure and AWS sidecars for SharePoint and OneDrive accounts. Teams accounts are not supported.
Cost and Billing Considerations
MIP label syncing and application involves the use of of Microsoft Graph APIs and container apps, both of which incur costs based on their runtime. Costs will therefore be incurred when syncing data (using Sync List) and applying MIP labels (using Apply, Apply All Changes, and Auto Apply).
MIP Label Syncing
Updating DSPM with the latest MIP labels from your Purview system (using Sync List) may consume Microsoft cloud compute resources and can result in additional charges within your Microsoft 365 environment.
MIP Label Application
Applying MIP labels through DSPM (using Apply, Apply All Changes, and Auto Apply) may consume Microsoft cloud compute resources and can result in additional charges within your Microsoft 365 environment.
DSPM applies MIP labels using the Microsoft Graph assignSensitivityLabel API. This is a Microsoft metered API, meaning usage of the API may incur charges. Each file label application or relabeling action counts as one API call. According to Microsoft’s metered API pricing, there is a cost of $0.00185 USD per API call.
For large-scale labeling operations, total cost is directly proportional to the number of files labeled.
Be sure to consider the following when enabling automated labeling:
- High-volume or bulk labeling operations may increase API consumption.
- Misconfigured mappings can unintentionally trigger large-scale relabeling.
You can monitor API consumption and related charges in Azure Cost Management + Billing.
Using MIP Labels
Microsoft Purview sensitive labels can be mapped to and from DSPM to ensure that Data Classification used on DSPM reflects the sensitivity classification rules set up on Purview. This ensures consistency across the organization for Data Protection / Information Protection policies.
Data security team can create new sensitivity labels on Purview based on the organization requirement and these can be synced to DSPM. Once these are synced the MIP labels can be mapped with the Data Classification set up on DSPM and once it is done, all the documents from Microsoft OneDrive and Sharepoint can be updated with the labels based on the scan classification outcome from DSPM.
Microsoft API supports limited set of File formats for which Sensitivity Labels can be applied. The list of the file formats is given here - https://learn.microsoft.com/en-us/purview/sensitivity-labels-sharepoint-onedrive-files#supported-file-types
For example:
Some of the documents on OneDrive / Sharepoint are classified with Sensitivity Label "Public" based on a previous review. Post scanning task of the data from DSPM, it gets classified with PHI, then the user can update the MIP label to "PHI" for the document from DSPM admin configuration.
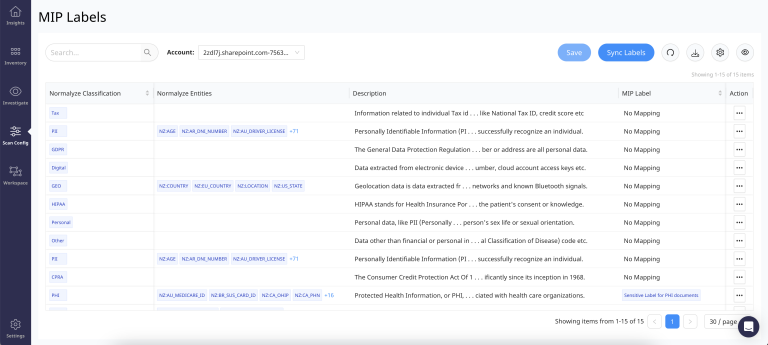
The details for each of the options and columns are as follows:
- Account - This shows the list of Microsoft Sharepoint or OneDrive accounts that are currently onboarded on DSPM.
- Save - This option is used to save the changes when a MIP label is mapped with a DSPM classification based on Information Protection policy definition.
- Sync Labels - This triggers the syncing of Sensitivity Labels that are created on Microsoft Purview to DSPM. By default when a cloud run for the Sharepoint / OneDrive account is run, it syncs all the labels from MIP to DSPM. Otherwise on selecting this it syncs on a standalone basis as well.
The details for the each of the columns are as follows:
- Normalyze Classification - This column lists all the data classification labels which are defined on DSPM platform.
- Normalyze Entities -This column lists the entities that are attached with each of the classification. This is not applicable for custom entities since they cannot be attached to a Data Classification label.
- Description - Details for each of the data classification field.
- MIP Label - This column shows if the DSPM data classification is mapped to a specific MIP label or not. If there are no mapping, then it shows "No Mapping" and when the mapping is setup, it shows the name of the "Sensitivity Label" as defined on the Purview platform.
- Action - The selection and assignment of MIP Labels to map with DSPM classification is done from this button.
The mapping has to be applied for Sharepoint and OneDrive separately since each is considered as an independent application from DSPM perspective.
Steps to map MIP Label with DSPM data classification labels are as follows:
- Navigate to Scan Config - MIP Labels

- For the specific DSPM Classification - select Action - Edit Mapping
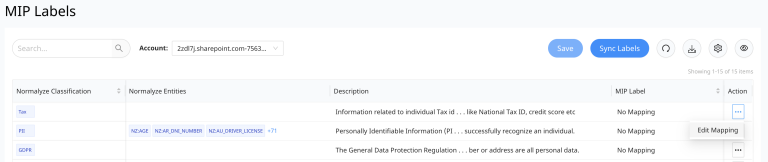
- On selecting "Edit Mapping" - pop up block will come up which shows the list of all the Sensitivity labels synced from the Purview account.
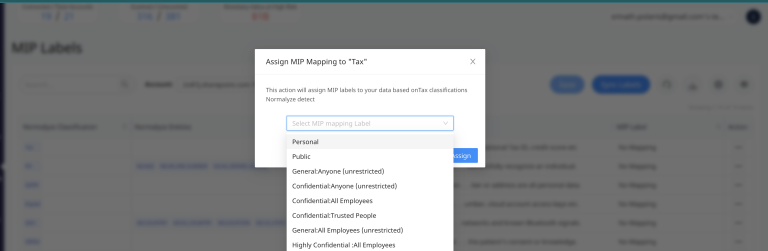
- Select the sensitive label which is designated to be mapped with the selected DSPM Classification.
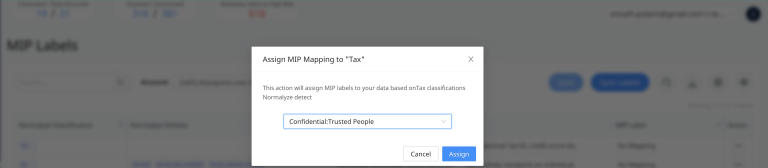
- Select Assign after selecting the MIP Label as shown in the above Screenshot.
- On selecting Assign, pop up window closes and the Save button gets enabled. The selected Sensitivity label is displayed under the MIP Label column

- On selecting Save, DSPM triggers the workflow which will apply the selected MIP Sensitivity Label to all those documents that are classified with the selected DSPM classification.
For example, in the above screenshot all the documents in DSPM which are part of Sharepoint or OneDrive application and have Data Classification "Tax" applied will be updated with the sensitivity label "Confidential:Trusted People" by Purview application on Sharepoint or OneDrive. For users reviewing the documents from Sharepoint application the applied label will be shown accordingly.
After MIP labels are applied to files, a Full Data Scan must be run before the MIP labels will appear on the Files tab.
You may not see the MIP labels on the Files tab immediately. It can take up to 24 hours for the labels to be applied to files.