Account Settings - IdP Configuration
Set up your account with the Identity Provider you want to use to access Proofpoint Information and Cloud Security Platform. You'll sign in with the selected provider.
Proofpoint supports most IdPs such as, Google IdP and OneLogin.
-
When setting up, you will need to copy items from the Proofpoint ITM console to the IdP dashboard and from the IdP dashboard to the Proofpoint ITM console. Keep both open until you complete the process.
Setting up the Account Provider
-
From the Proofpoint Information and Cloud Security Platform, select the Administration app. Select Account > Settings.
-
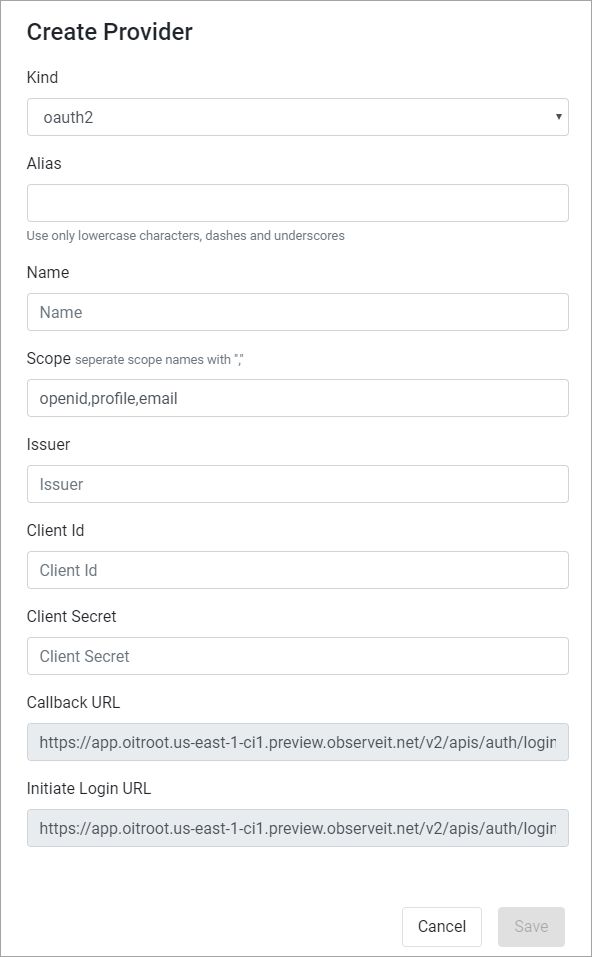
Click Create and the Create Provider dialog box opens.
-
Depending on the protocol Kind and the provider, complete the relevant fields.
For up-to-date, step by step directions, see the account provider documentation:
For instruction on setting up Okta SAML, see Setting up Okta SAML Account Identity Provider.
Field Kind:
OAuth 2.0
OAuth 2.0:Office 365Kind:
SAML
SAML :Office 365Notes Alias Enter Alias Enter Alias System name Name Enter Name Enter Name Name you assign to the IdP. It is the name that appears on the ITM login page. Scope Do not change this field N/A Allows the ITM application to verify user’s identity. Issuer Issuer
from Sign On tabIdentifier (Entity ID)
from Set up Single Sign-onEntry Point N/A Login URL SAML protocol only Certificate N/A Download certificate from SAML Signing Certificate SAML protocol only Client ID Client ID
from General Settings areaN/A OAuth 2.0 protocol only Client Secret Client Secret
from General Settings areaN/A OAuth 2.0 protocol only Callback URL Copy Callback URL to Login redirect URIs in the OKTA Create OpenID Connect Integration screen Copy Callback URL to Reply URL Where the authorization server sends the user once the app has been successfully authorized Initiate Login URL optional
Enabling an IdP
After setting up the IdP, enable it from the list of Providers. Many users prefer to use Microsoft Office 365 or Google Workspace so they are described in this example.
-
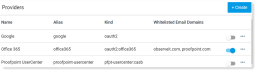
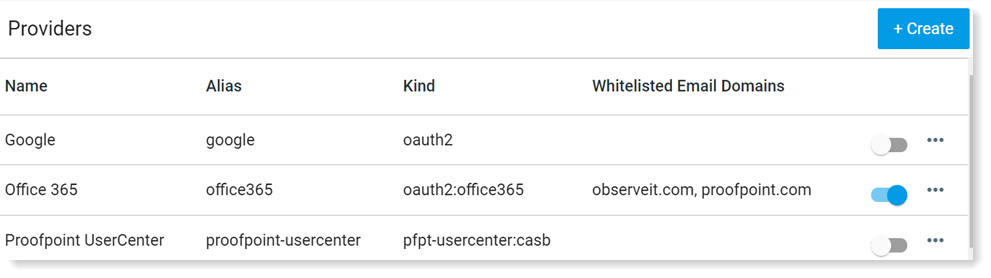
From Settings, scroll to the bottom of the page to the Providers section.
-
Turn on the toggle next to the provider, such as Office 365 or Google.
This just enables the authentication mechanism. This setting does not allow anyone using Microsoft Office 365 or Google Workspace to access your console.
-
Click ... next to the toggle and select Allow Email Domains.
-
Enter the email domains or domains for the provider, such as proofpoint.com. Make sure you press enter after each domain. Click Done when you are finished.
This just allows the authentication for the domains to access the console. This setting does not allow everyone with this domain to access your console.
-
To add users and their access policies, From the left-menu, select User Management > Users and add the email of the users.
See Users.
For up-to-date, step by step directions, see the account provider documentation:
OKTA
Azure
For instruction on setting up Okta SAML, see Setting up Okta SAML Account Identity Provider.
Related Topics:
Account Settings - IdP Configuration