MIP labels 2.0 are supported for Azure sidecars for SharePoint and OneDrive accounts. Teams accounts are not supported.
You can map Microsoft Purview sensitivity labels (also known as MIP labels) to DSPM data classes, entities, profiles, and Unified DLP detectors. DSPM uses these mappings to apply your existing MIP labels to your sensitive data.
How MIP Mappings Work
You can map a MIP label to a data class or data type (entity, profile, or detector). Once you’ve created a MIP label mapping and applied it to an account, DSPM will scan the account and apply the MIP label to all files that have the corresponding data class, entity, profile, or detector.
For example, let’s say you have a “Highly Confidential” MIP label that’s been applied to Microsoft Excel files containing social security numbers. You decide to map this MIP label to the “PERSON_SSN” entity, so you create the mapping and apply it to your Microsoft account. DSPM then applies the “Highly Confidential” MIP label to all files that have the “PERSON_SSN” entity. After the next Full Data Scan is run on the account, the “Highly Confidential” MIP label will be shown on the data store Files tab for the relevant Excel files.
You can apply a default MIP label to any file that isn't matched by a data class, entity, profile, or detector. The same label is used for every unmatched file, ensuring complete labeling coverage. For details, see Create a Mapping.
Applying a default label may result in label application to a large volume of files. This may significantly increase compute consumption and associated costs.
Cost and Billing Considerations
MIP label syncing and application involves the use of Microsoft Graph APIs and container apps, both of which incur costs based on their runtime. Costs will therefore be incurred when syncing data (using Sync List) and applying MIP labels (using Apply, Apply All Changes, and Auto Apply).
MIP Label Syncing
Updating DSPM with the latest MIP labels from your Purview system (using Sync List) may consume Microsoft cloud compute resources and can result in additional charges within your Microsoft 365 environment.
MIP Label Application
Applying MIP labels through DSPM (using Apply, Apply All Changes, and Auto Apply) may consume Microsoft cloud compute resources and can result in additional charges within your Microsoft 365 environment.
DSPM applies MIP labels using the Microsoft Graph assignSensitivityLabel API. This is a Microsoft metered API, meaning usage of the API may incur charges. Each file label application or relabeling action counts as one API call. According to Microsoft’s metered API pricing, there is a cost of $0.00185 USD per API call.
For large-scale labeling operations, total cost is directly proportional to the number of files labeled.
Be sure to consider the following when enabling automated labeling:
- High-volume or bulk labeling operations may increase API consumption.
- Misconfigured mappings can unintentionally trigger large-scale relabeling.
You can monitor API consumption and related charges in Azure Cost Management + Billing.
Prerequisites for Using MIP Labels
The following items are required in order to use MIP labels in DSPM.
- If you are onboarding an account in another Team:
- The user must have a metered API connection in Azure.
- The
InformationProtectionPolicy.Read.AllAPI permission must be enabled in the Azure App Registration.
- Ensure that the ARN containing the secret is correctly configured, and that the secret being used is the one retrieved from the Azure App Registration.
- Grant several API permissions to the DSPM App Registration. For details, see Microsoft Purview Information Protection (MIP) Labels.
MIP Label Mapping Rules
- DSPM will only apply MIP labels to the file types supported by Microsoft. Supported file types include:
- Word files with the following extensions:
.docx.docm - Excel files with the following extensions:
.xlsx.xlsm.xlsb - PowerPoint files with the following extensions:
.pptx.ppsx
For details, see the Microsoft documentation.
- Word files with the following extensions:
- Multiple DSPM labels can be mapped to the same MIP label. For example, you could map the “PII” data class and the “PERSON_SSN” entity to the same MIP label.
- A file may match multiple mapping rules. This can occur if a file contains multiple items (data classes, entities, profiles, or detectors) that are mapped to different MIP labels. In this case, the MIP label with the highest priority will be applied to the file.
- Once a MIP label has been applied to a file, it can be replaced with a higher priority MIP label through a subsequent mapping application.
- Once a MIP label has applied to a file, it will never be replaced with a lower priority MIP label through a subsequent mapping application.
- If you delete a mapping, any MIP labels that have been applied to files using this mapping will not be removed. The MIP labels will remain unless they are replaced by a higher priority MIP label.
Using MIP Label Mappings
To work with MIP labels:
- In the left panel, go to Scan Config > Labels and Tags.
- Select the MIP tab.
Sync Labels
Before you begin to create mappings, click Sync List to:
- Update DSPM with the latest MIP labels from your Purview system.
- Update the list of data classes, entities, profiles, and detectors that you can use in your mappings.
Be sure to perform a sync periodically to ensure you’re working with the latest information.
You cannot add, modify, or delete MIP label mappings while a sync is in progress.
Create a Mapping
Map a MIP label to a DSPM label.
A DSPM label can be a data class, entity, profile, or detector.
- In the Account list, select a Microsoft 365 account. The mappings you create will be used for files in this account.
- Select the type of data you want to map:
- Data Map entities, profiles, and detectors to MIP labels.
- Data Classes Map data classes to MIP labels.
Select Data Classes if you want to apply a default MIP label to all files without a data class, entity, profile, or detector.
- Click + Mapping.
- In the DSPM Label list, select a label (data class, entity, profile, or detector).
To apply a default MIP label to all files without a data class, entity, profile, or detector, select None.
Applying a default label may result in label application to a large volume of files. This may significantly increase compute consumption and associated costs.
- In the MIP Label list, select the corresponding MIP label. You can select a parent or child MIP label.
- Save the mapping:
- To save the mapping without applying it to files, click Create.
- To save the mapping and apply it to files, click Create & Apply.
Edit a Mapping
You can change the MIP label in an existing mapping.
If you want to change the DSPM label, create a new mapping.
- In the row for the mapping, expand the list in the Action column, then select Edit Mapping.
- In the MIP Label list, select a MIP label.
- Save the mapping:
- To save the mapping without applying it to files, click Save.
- To save the mapping and apply it to files, click Save & Apply.
Apply Mappings to Files
When you apply a mapping, DSPM applies the MIP label to all files that have the corresponding data class, entity, profile, or detector.
After MIP labels are applied to files, a Full Data Scan must be run before the MIP labels will appear on the data store Files tab.
You may not see the MIP labels on the Files tab immediately. It can take up to 24 hours for the labels to be applied to files.
To ensure that the latest MIP labels are shown on the Files tab:
- Use the Apply all mappings and Apply a mapping options to apply your mappings, then run a Full Data Scan.
- Enable the Auto Apply option for each of your mappings. This ensures the Files tab will be automatically updated when a Full Data Scan is run.
Apply all mappings
You can apply all of your mappings at once. For example, you might want to do this after you create your initial mappings. MIP labels will be applied in order, based on the MIP label priority.
- Click Apply All Changes.
To stop the MIP label application, click Stop Apply All.
Apply a mapping
You can manually apply one specific mapping. For example, you might want to apply a new mapping you’ve created.
- In the row for the label, click Apply in the Action column.
To stop the MIP label application, click Stop.
Automatically Apply Mappings to Files
You can set a mapping to be automatically applied to new and modified files during Data Scans for the account.
- In the row for the mapping, turn on the toggle in the Auto Apply column.
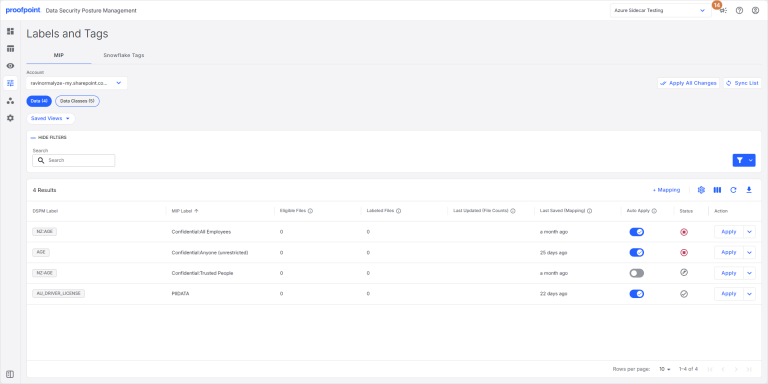
View Mapping Information
The mappings you’ve created are shown on the MIP tab. The following information is available for each mapping.
|
Column |
Description |
|---|---|
|
DSPM Label |
DSPM data class, entity, profile, or Unified DLP Detector. |
|
MIP Label |
MIP label that has been mapped to the DSPM label. |
|
File Counts |
The following file counts are based on the most recent Full Data Scan of the account:
When you first use MIP labels, the file counts will be set to zero. Run a Data Scan to refresh the file counts and obtain the latest values. You can still create and apply MIP labels when the file counts are set to zero. |
|
Last Updated (File Counts) |
When the file counts were last updated. |
|
Last Saved (Mapping) |
When the mapping was last saved. |
|
Auto Apply |
Whether the mapping is applied automatically during Full Data Scans. |
|
Status |
Current status of the mapping application. Hover over the status icon to view details about the status.
|
View the Mapping Quota
There is currently a soft threshold that states 10,000 MIP labels can be applied per day. MIP labels will continue to be applied even if you reach the mapping quota.
- To view the quota, click the Settings icon.
Delete a Mapping
You can delete an existing mapping. Any MIP labels that have been applied to files using this mapping will not be removed. The MIP labels will remain unless they are replaced by a higher priority MIP label.
- In the row for the mapping, expand the list in the Action column, then select Remove Mapping.
Export Mappings
You can export your MIP label mappings to a CSV file.
- To export your mappings, click the Download icon.
View Mapping Progress and Errors
You can view the workflow status for a mapping application. This includes details about the progress of a currently running application and any errors that occurred for a failed application.
- Click the row for the mapping. A side panel appears.
- If the mapping application experienced any errors, contact Proofpoint Support and provide them with the Workflow ID shown in the side panel.
View MIP Labels Applied to Files
You can view the MIP labels applied to files on the data store Files tab.
After MIP labels are applied to files, a Full Data Scan must be run before the MIP labels will appear on the Files tab.
You may not see the MIP labels on the Files tab immediately. It can take up to 24 hours for the labels to be applied to files.