Rules define and detect suspicious activity. In addition to enabling automatic generation of alerts and notifications, rules provide the option to configure automatic remediation and access controls. This page provides general instructions on how to create/edit rules in CASB.
How to Create Rules
The Access | Suspicious Login rule type allows you to alert on Suspicious Login events, Proofpoint CASB’s system-generated automatic threat detection events. This rule should not be confused with the Access | Login rule type, which enables you to alert on Login events as retrieved from the cloud service API.
-
In the main menu, navigate to Policy > Rules.
-
On the right side of the toolbar, click Add Rule.
A new rule with the default rule parameters is added as the last entry in the Rule Editor table.
In the Rule Type column of the new rule, a drop-down menu appears. The list of available types varies according to the selected cloud service.

Rule types are divided into the following categories:
-
App Governance: For rules relating to third-party applications
-
Data: For rules relating to files
-
Access: For rules relating to user logins and authentication, including suspicious logins (automatic threat detection)
Rule types are associated with a specific resource. The resource is the entity that is queried when determining if an event should trigger a rule (for example, the resource for a Data rule is a file; the resource for an App Governance rule is an application).
-
-
Select a rule type.
The rule type appears in the Rule Type column.
-
Narrow the Rule Type criteria that trigger the rule:
-
Hover over the rule, and click
 to the right of the Rule Type column.
Details of the rule type’s attributes appear.
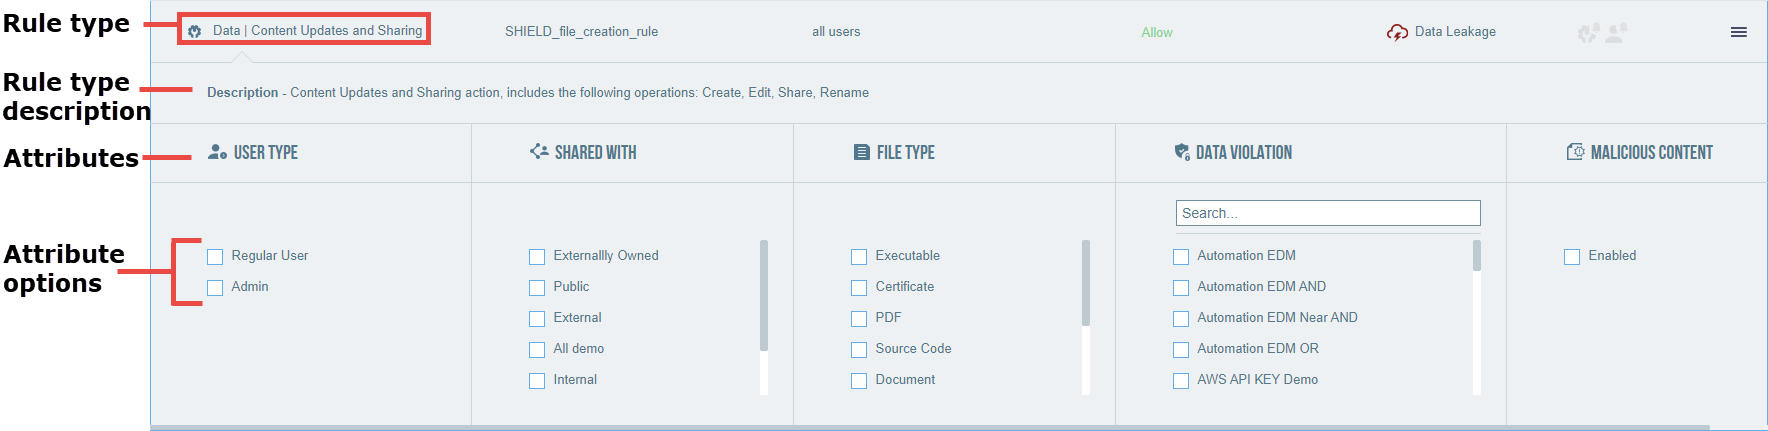
Attributes represent specific properties of the rule type’s resource or conditions of the event. Relevant attributes vary with rule type (because the resource varies with the rule type). For example, a Data | Content Download rule type has the resource file, and has attributes applicable to files (for example, Shared With and File Type).
The following are examples of attributes:
-
Data Violation (resource = file): Dynamic list of global and user-defined DLP Detectors currently listed in the DLP editor
-
Malicious Content (resource = file): If enabled, only files with malicious content trigger a rule match.
-
Scopes (resource = 3rd party application): Only the addition of a third-party application with the selected scopes (permissions) triggers a rule match.
-
Applications (resource = Login Service): For Adaptive Access policies, a list of all applications integrated via AAC.
Each attribute option selected refines the rule. When options for an attribute are selected, the rule is only triggered if the selected options are true for the event. For example, selecting an App Severity of Critical indicates that only a third-party application with a Critical severity level triggers the rule.
-
-
For each attribute, select zero, one, or more options.
-
Close the expanded area by clicking
to the right of the Rule Type column.The selected attributes appear with the Rule Type in the Rule Type column.
-
-
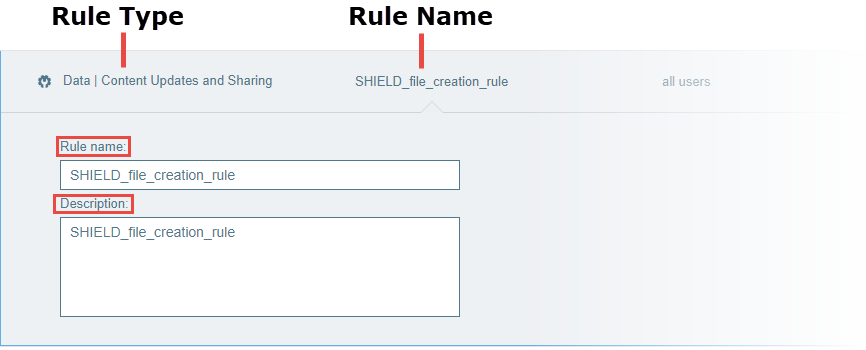
Provide a name for the rule:
-
Hover over the rule and, click
to the right of the Rule Name column.The Rule name and Description fields appear.
-
Type a name and description for the rule.
Both fields are optional. When no name is provided, the Rule Type is used as the rule name.
-
Close the expanded area by clicking
to the right of the Rule Name column.The provided rule name appears in the Rule Name column.
-
-
Narrow the Context criteria that triggers the rule:
-
Hover over the rule, and click
to the right of the Context column.Details of the context attributes appear.

Context describes the circumstances under which the event occurred, including relevant users, location, and networks. The context attributes relevant to the rule are dictated by the rule type.
The following are examples of context attributes:
-
Users: Lists all users in your organization. You can include or exclude groups and users in the rule by toggling Include and Exclude. You can select a group from the list or click Select Users to select one or more users.
-
Location: Select safelist countries, blocklist countries, or click Select Countries to select individual countries. Safelists and Blocklists are defined in Setup > Locations.
-
Network: Select networks. Networks are defined in Setup > Networks.
Each context option selected refines the rule. When options for a context attribute are selected, the rule is only triggered if the selected options are true for the event. For example, selecting a group for the Users attribute causes the rule to only be triggered if a user in the selected group performed the event.
-
-
Select none, one, or more options for each of the context attributes.
-
Close the expanded area by clicking
to the right of the Context column.The selected attribute options appear in the Context column.
-
-
Specify Remediation or Access Controls:
-
Click the Remediation / Access Control column.
A drop-down menu with remediation or access control options appears.

The options depend on the rule type and cloud service.
-
Select one of the options. For Access | Login and Access | Suspicious Login rule types, optionally select more than one.
The selected remediation or access control option appears in the Remediation/Access Control column.
-
-
Configure the category and severity of the alert that is generated upon a match:
-
Click
 in the Alert column and then select a severity for the alert in the drop-down menu.
The color of the icon reflects the selected severity.
-
Click Select Alert in the Alert column and then select a category for the alert in the drop-down menu.
The selected alert type appears in the Alert column.
An alert with the specified category (and severity) is generated when an event matches the rule.
-
-
Configure email notifications when an alert is generated:
-
To send an email to the CASB administrators, click
 in the Notify column. To see a list of CASB administrator who will receive notifications, go to CASB app > Set Up > General Settings > Notifications.
 -
To send an email to the user who triggered the alert, click
 in the Notify column.
 -
To configure a custom email template for notifications, contact your Proofpoint account manager.
-
-
Deploy the rule; click Deploy in the toolbar and confirm.
-
The rule is now deployed.