One of the main challenges in defining use cases is that they are often broad and generate large amounts of data The security teams may find it difficult to triage through the new set of alerts.
To counter that, a focused approach is recommended.
Parts of the Use Case
The diagram shows the components of the focused approach.
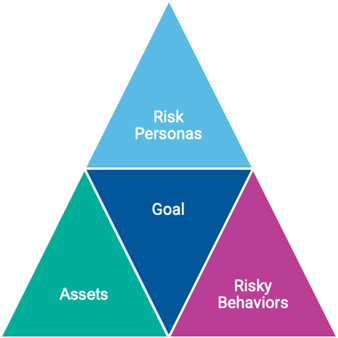
Each part of the diagram is described and an example using the parts of the diagram follows.
Goal
Start by defining a business goal. This is most often defined by the business stakeholders and can include things like reducing risk of intellectual property theft, preventing leaking of employee Personally Identifiable Information (PII), gain visibility into the organization’s leavers. For example, Protecting confidential contract data.
Risk Personas
Next, define who are the people who have access to this information. Determine who are the groups who can access the data today, and who are the individuals who have privileged access to the data.
Privileged access is especially important since anyone with higher access privileges will have higher impact in case of a malicious intention or a mistake. Determine how these people are defined in your organization – is there a naming convention? Are there Active Directory Security Groups?
For example, it has been determined that people who have access to contract data are the contracts team defined by Active Directory Security Group CORP\SG-Contracts, the CFO (Chief Financial Officer), denoted by CORP\cfo, and privileged IT administrators, defined as CORP\Domain Admins.
Assets
Assets – data assets, in this case – are where the data resides. Data can be located on a corporate SharePoint site, a file server share, or in an enterprise application such as Salesforce.
Risky Behaviors
What are the behaviors we are trying to detect? Are you trying to detect uploads to the web, exfiltration of data to USB devices, copying data to Google Drive client?
In this example, the behavior you want to detect exporting data from an enterprise application and uploading it to personal Google mailbox.
Actions
Lastly, define what you would like to do when your use case goes into action. Some examples include:
-
Send an automated notification to SOC which would initiate an investigation workflow
-
Use Proofpoint ITM Agent’s prevention features to prevent the file USB copy
-
Use a webhook notification to initiate an automated workflow
Use Case Example
This section provides a use case based on the parts of the diagram.
In the example, you want to detect when data from is exported an enterprise application and uploading it to personal Google mailbox.
With your use case defined you can configure the use case into the Proofpoint Endpoint DLP console.
Create the Condition
-
Start by creating a condition (see Conditions). For this example, the condition is named Protecting confidential contract data.
-
From the Administration app, select Definitions > Conditions.
-
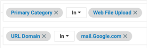
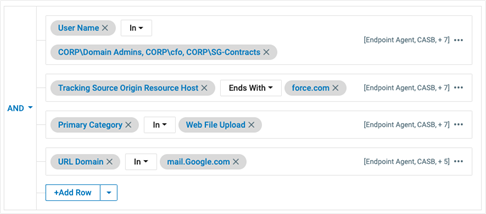
In the Details tab, add the users you want. Select User > User Name and select the users you want. For example:

-
Next define where the data is downloaded from. In the example, you want to monitor files downloaded from Salesforce.
When a file is downloaded, the endpoint’s Agent tracks that file’s life on that endpoint. This is called file tracking.
To let Proofpoint Endpoint DLP know we only want to look for files downloaded from Salesforce add a new row. Select Files/Resources > Tracking Source Origin Resource Host.
-
If you know the exact URL domain of your Salesforce instance, click Select Values and enter it.
Alternatively you can just use the Ends With clause and expand the selection to Salesforce instance:

-
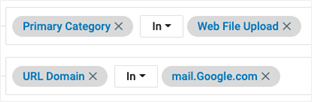
Next define which behavior you want to track. You want any file uploads to Google mailbox. .
Add another row for the file upload behavior. Select Primary Category > Web File Upload.
-
Add another row for Google mailbox by selecting Website > URL Domain and select mail.Google.com as the value.
-
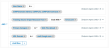
Save the completed condition.
Here is a summary of the condition you created:
-
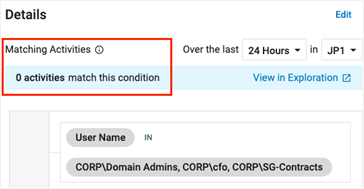
Evaluate how many events this Condition generates. On the Conditions page, click the condition and in the details panel on the right look at Matching Activities. You want to make sure that the matching activity shows many events, you should focus the condition some more. A condition with too many events, may not be a suitable candidate for an alert rule.


Create an Alert Rule
To set up a detection rule do the following:
-
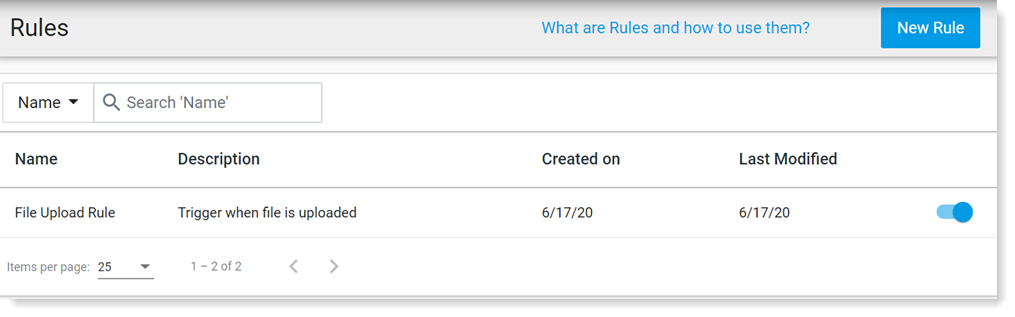
From Administration application, select Policies > Rules. Select New Detection rule.
-
Name the rule and add a tag. Rule Tags, select Add Tags and choose Data Exfiltration. This tag is optional and it helps you find rules easier in the Rules section of Administration application. Click Next.
-
In the Assignments tab validate Endpoint Agent is selected. Click Next.
-
On the left-side, select Select Existing Conditionand select the condition you created.
-
In the Actions area, enable Generate Alert and set the alert severity.
-
Click Save.
For more, Quick-Reference Guides, see ITM / Endpoint DLP Onboarding.