Differentiate Between Corporate and Personal
Organizations often try to differentiate between an end-user's personal and corporate activity.
Detection and Prevention based on Website Logged In Email
When Proofpoint ZenWeb is installed, the Agent can identify if a user is using a Corporate or Personal email as identification when browsing, uploading, downloading activities on various Websites.
This feature is available from Windows 5.0.1 and Mac 5.0.0 and only when Proofpoint ZenWeb is installed.
The field Effective User Attributes lets you identify if the user is using a personal or corporate email address. Data will be added to the ZenWeb supported activities and available in detection and prevention rules.
Supported Websites:
-
ChatGPT
-
Google Drive
-
SharePoint
-
Box
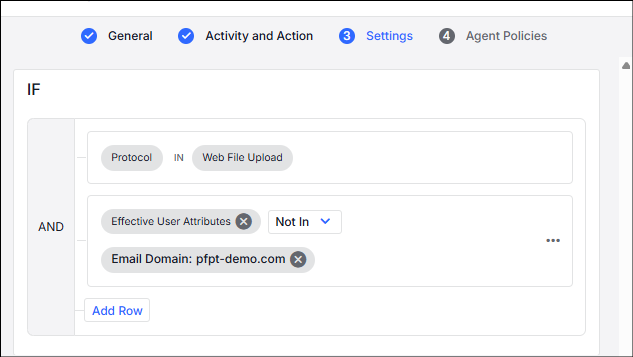
Prevention Rule Example: Blocking Web File Upload to Non-Corporate Emails
This is an example of a prevention rule that blocks Web file upload to emails. You only want users to upload to your organization's email and to block any attempt to upload to other emails. Using the Sync Product Name and the Not In operator, you can set this rule.
-
From Proofpoint Data Security, select the Administration app. Select Endpoints > PreventionRules.
-
Click New Rule and from the Prevention Rule area and click Create Rule.
-
In General tab, complete the Name field and Description (optional) field.
-
Click Next to continue.
-
In the Activity and Action tab:
-
In the Activity area, select Web File Upload.
-
In the Action area, select Block.
Click Next.
-
-
In the Settings tab, in the If section, Web File Upload displays as the Protocol.
-
To block all email, except the corporate email (in this example the corporate email is "pfpt-demo.com" do the following:
-
Click Add Row and select Select Field.
-
From the list of fields, select Activity > Effective User Attributes. Click Done.
-
Operator is Not In.
-
Click Select Values and from the list of Observed Values select the email that is not blocked. Click Done.
-
Differentiate Between Corporate and Personal Sync Folders
When files are copied/moved to local sync folders, the Agent can extract attributes of local sync folders. From these attributes, it is possible to differentiate between exfiltration to business or personal sync folders.
The Agent detects attributes of local sync folders Files/Resources > Attributes when Web File Sync activity occurs. Since each type of sync folder contains different attributes that can be detected, the Sync General Identifier attribute was developed and it contains the most important attribute for identification any supported sync folder.
Currently only OneDrive is supported.
From version 3.1.0.x, these attributes are supported for prevention rules for Mac Agents for One Drive only. You can now set a prevention rule using these attributes.
The table shows some attributes included in the Attributes field for One Drive with examples.
| Attribute | Example |
|---|---|
|
Sync Account Kind |
Personal |
|
Sync Login ID |
20d8b0d170b829f6 |
|
Sync Login EMail |
mickey4work@gmail.com |
|
Sync Login EMail Domain |
gmail.com |
|
Sync General Identifier |
gmail.com |
Prevention Rule Example: Blocking Non-Corporate Activity at Proofpoint
This is an example of creating a rule using the Device/Sync Folder field to identify Web File Sync for personal use at Proofpoint. If the Identifier does not detect proofpoint.com then the file movement was probably personal.
-
From Proofpoint Data Security, select the Administration app. Select Endpoints > Prevention Rules.
-
Click New Rule and from the Prevention Rule area and click Create Rule.
-
In General tab, complete the Name field and Description (optional) field.
-
Click Next to continue.
-
In the Activity and Action tab:
-
In the Activity area, select Cloud Sync Folder
-
In the Action area, select Block
Click Next.

-
-
In the Action area, select Block.
-
In the Settings tab, in the If section, Cloud Sync Folder displays as the Protocol.
-
Add One Drive as the sync product. Select > Select Field and from the list of fields, select Devices > Sync Product Name. Select One Drive as the Value and set the operator to In. Click Add Row.
-
Add Proofpoint as the Sync General Identified that contains the important attribute that identifies Proofpoint in One Drive. Select > Select Field and from the list of fields, select Devices > Attributes. Select Sync General Identifer:proofpoint.com as the Value and set the operator to Not In.

Exploration Example: Review Non-Corporate Activity at Proofpoint
This is an example of identifying non-business web sync folders in an Exploration.
-
From Proofpoint Data Security, select the Analytics app. From the left-side-menu, select Activity > Explorations. Click New Exploration button.
Your new exploration opens and you see the source node. You can see and change the details as needed.
-
To select Web File Sync activity. Click + and configure the next node. From Filter by, select Activity > Primary Category > Web File Sync. Click Done.
-
To see all activity on One Drive, click + and configure the next node. From Filter by, select Devices > Sync Product Name > One Drive. Click Done.
-
To see all activity non-Proofpoint, click + and configure the next node. From Filter by, select Devices > Attributes > Sync General Identifier:proofpoint, inc. Make sure to select Excludes from the operators. Click Done.

All Web file sync activity not to Proofpoint displays.