Step 1. Configure Azure Access
Create a New App Registration
- Go to portal.azure.com.
- Select App registrations.

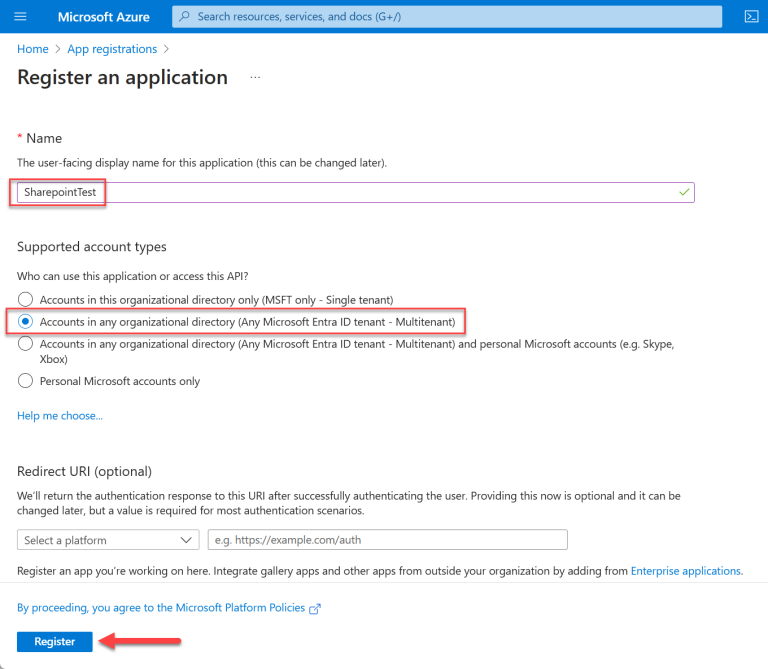
- Select New registration.

- Enter the Name for the app, then select the second account type (Multitenant). Select Register.
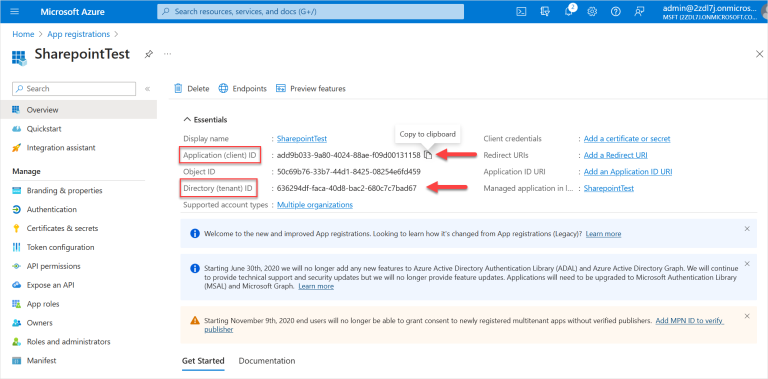
- Copy the Application (client) ID and Directory (tenant) ID and save them in a file (such as a text file).
When you hover over these IDs, you will see an option to Copy to clipboard for each ID. These IDs will be used later so make sure to save them.
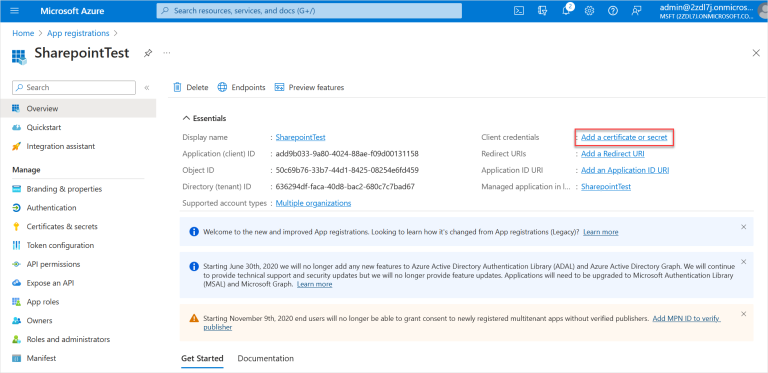
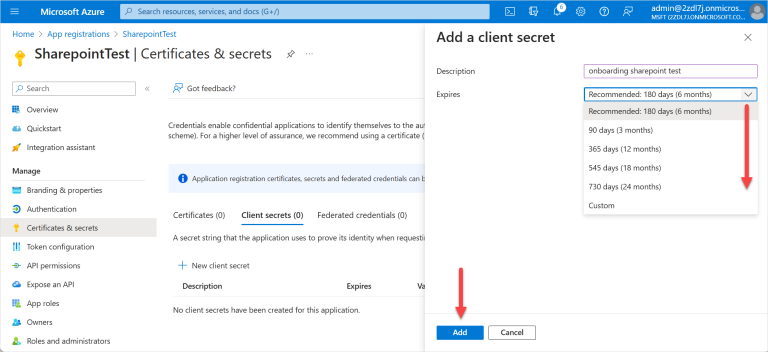
Add A Client Secret
- On the same screen, select Add a certificate or secret.
- Under Client secrets, select New client secret.
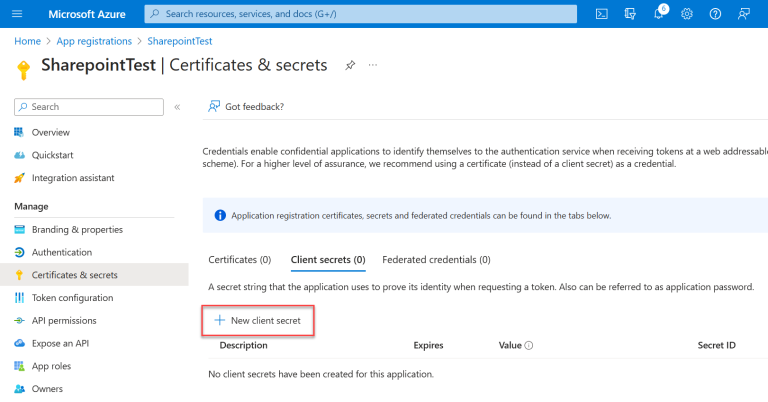
- Enter a Description. In the Expires list, select when the secret will expire. Click Add.
The recommended expiry period is 24 months.
- Copy the new client secret Value and save it in a file. You will use this value later.
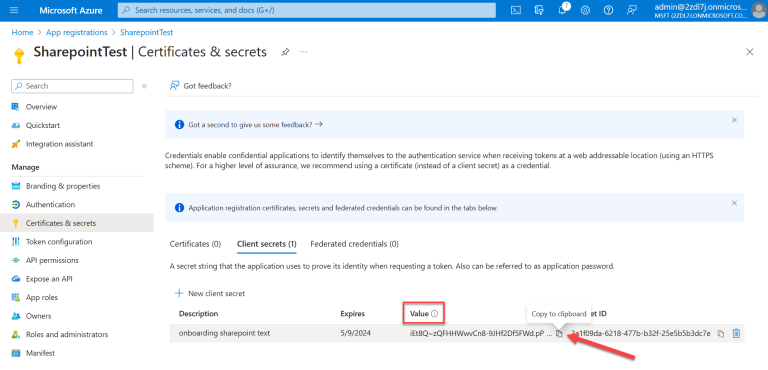
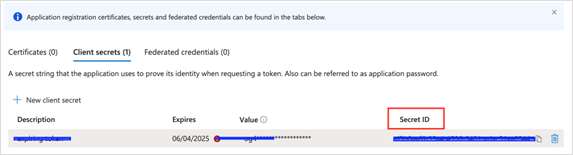
- Copy the Secret ID and save it in a file. You will use this value later.
Saved Values
At this point, you should have saved the following details from the previous steps:
- Application (client) ID: This will be the value used for client_id.
- Secret Value: This will be the value used for client_secret.
- Directory (tenant) Id: This will be the value used for tenant_id.
- Secret ID: This will be the value used for secret_id.
You will use these values to create the AWS secrets and the Azure secrets in the following sections.
Set API Permissions
- Select API permissions from the left menu.
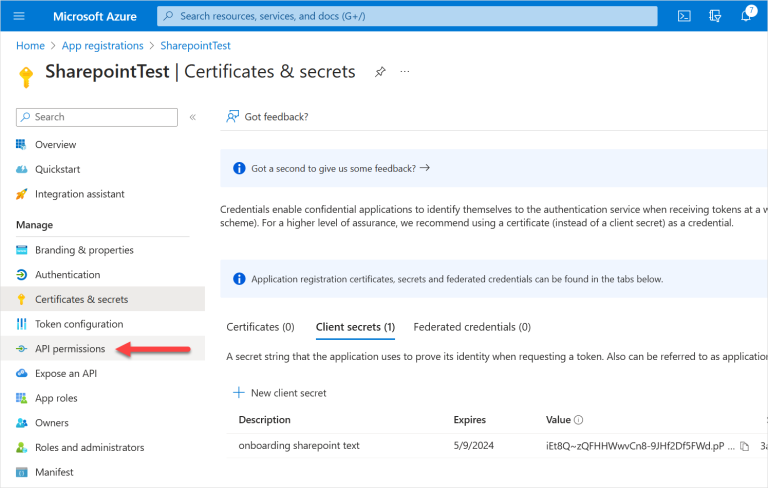
- Select Add a permission.

- Select Microsoft Graph.
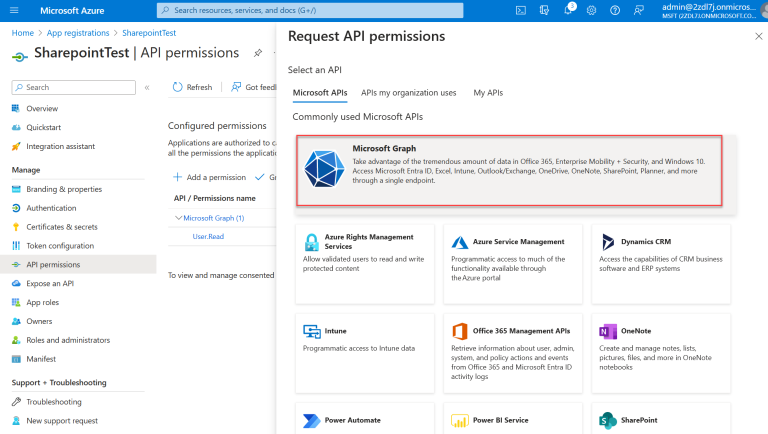
- Request API permissions:
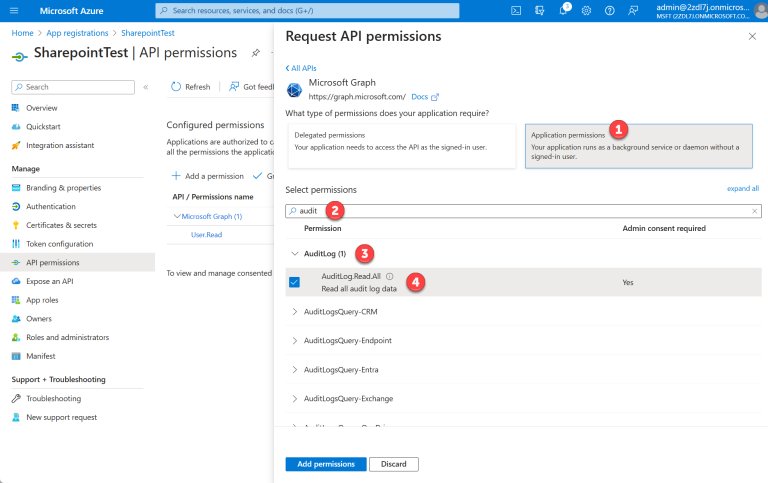
- Select Application permissions.
- Start typing the permission name into the search box to pull up a list.
- Once the permission group you want appears, with the arrow you can select to view specific permissions.
Select the checkbox(es) for the following permissions. Select all base permissions, plus the permissions for the Microsoft application you’re onboarding.
The details for each of these permissions are as follows:
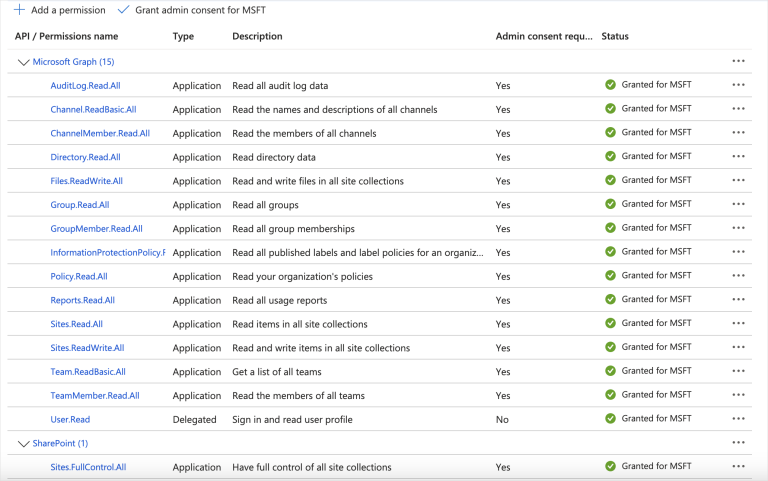
Base Permissions:
AuditLog.Read.All Permission to review the audit logs and check which users are dormant.
Reports.Read.All Permission to get the total number of files across all sites and how many are active files.
Group.Read.All Read group properties and memberships.
GroupMember.Read.All Read membership and basic group properties for all groups.
Application.ReadWrite.OwnedBy Detect secret expiration.For OneDrive:
Directory.Read.All Allows the app to read data in the organization’s directory, such as users, groups and apps.For SharePoint:
Sites.Read.All Allows the application to read documents and list items in all site collections on behalf of the signed-in user.For Teams:
Team.ReadBasic.All Get a list of all teams, without a signed-in user.
TeamMember.Read.All Read the members of all teams, without a signed-in user.
Channel.ReadBasic.All Read all channel names and channel descriptions, without a signed-in user.
ChannelMember.Read.All Read the members of all channels, without a signed-in user.
- After selecting the checkbox for AuditLog.Read.All, enter the text for the next item in the search box to find the group it is in. You can select all the permissions listed above and then add them all at once.
- Once you have selected the permission, select the Add permissions button.
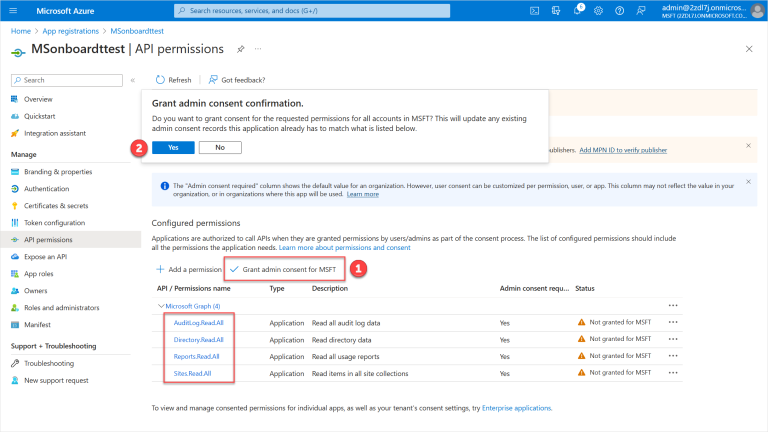
- Select Grant admin consent for MSFT. Select Yes to confirm.
Step 2. Sidecar Configuration
SharePoint, OneDrive, and Teams can be onboarded to DSPM with either AWS or Azure as a sidecar.
Prerequisites
- An AWS Account or Azure Account can be used as a sidecar for scanning your data, keeping your data within your boundary.
- If using an AWS Account as a sidecar account, the account must first be onboarded to DSPM with an Onboarding Version of 64 or later.
- If using an Azure Account as a sidecar account, the account must first be onboarded to DSPM with the configuration option Use as SaaS Sidecar selected, with an Onboarding Version of 17 or later.
AWS as Sidecar
Configure AWS Secrets Manager
The values you copied previously (see Saved Values) must be added to the AWS Secrets Manager, which then is used by DSPM to connect to the Microsoft SharePoint, OneDrive, or Teams application.
Add Azure App Credentials to AWS Secrets Manager
- Go to https://console.aws.amazon.com/secretsmanager.
- Choose Store a new secret.
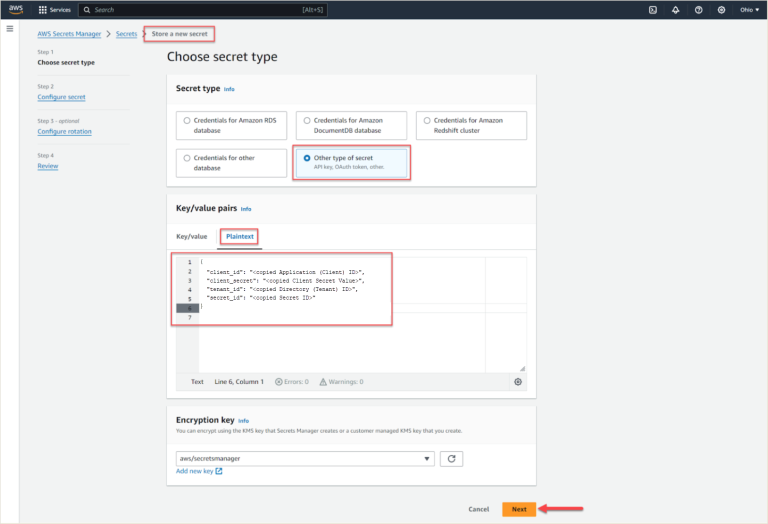
- Select Other type of secret.
- Select Plaintext.
Copy and paste the details below with your IDs and values from Saved Values. Use the following format:
{
    "client_id": "<copied Application (Client) ID>",
    "client_secret": "<copied Client Secret Value>",
    "tenant_id": "<copied Directory (Tenant) ID>",
    "secret_id": "<copied Secret ID>"
}
- Add the Secret Name and a description. Add the following Tag:
- Key: Name
- Value: Normalyze
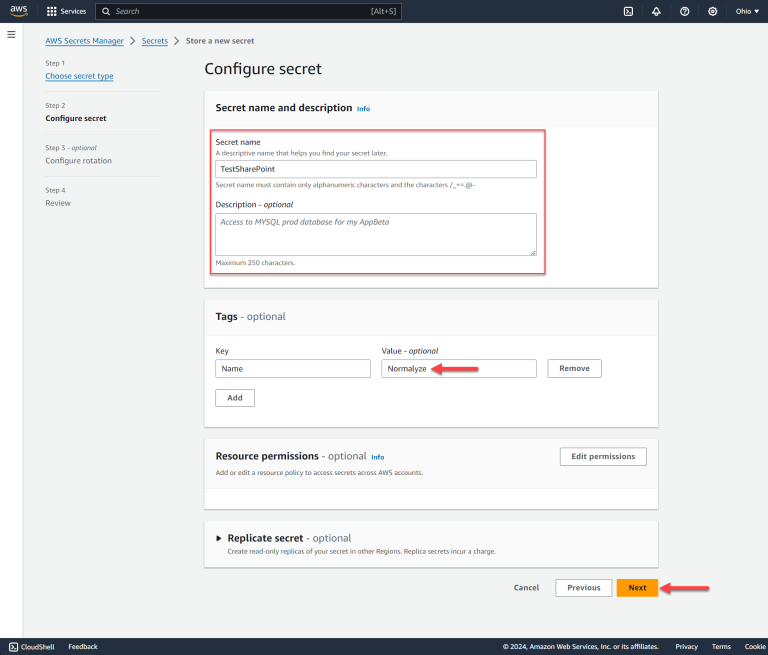
- Select Next twice to continue, then click Store on the final screen to save your secret.
- Select the Secret name in the screen that appears and copy the Secret ARN to a file. You will use this value later.

Azure as Sidecar
You will use the values you copied previously (see Saved Values) to create the secret under Azure Key Vault. This Key Vault is used by DSPM to connect to the SharePoint, OneDrive, or Teams application.
Configure Azure Key Vault Secret
Prerequisites
- If an Azure account is being used as sidecar, you must select the Use as Sidecar option for the account. If the Azure account is already onboarded to DSPM and this has not been enabled, follow the steps in Azure Onboarding Version Upgrade.
Ensure that step 3 is completed in Azure Onboarding Version Upgrade; this will mark the Azure account as a sidecar.
- The Azure Key Vault must be created in the in the Resource Group created by DSPM during the onboarding of the Azure account.
The resource group for the Azure account is in the following format: normalyze-<Onboarding-id>-<Region>. The <Onboarding-id> for the account onboarded to DSPM can be captured from the Account Details section:
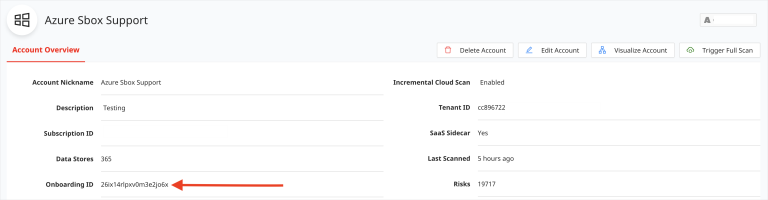
Make note of the <Region> being selected. You will need to enter this value in DSPM while onboarding the SharePoint, OneDrive, or Teams application.
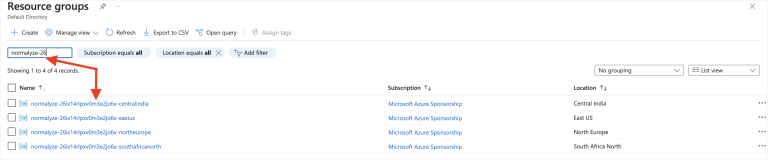
Search for the Resource Group (based on the normalyze-<Onboarding-id>-<Region> format) and note the one to be used.
- Copy and paste the details below, using the values from Saved Values, in the following format.
{
    "client_id": "<copied Application (Client) ID>",
    "client_secret": "<copied Client Secret Value>",
    "tenant_id": "<copied Directory (Tenant) ID>",
    "secret_id": "<copied Secret ID>"
}
Add Azure App Credentials to Azure Key Vault Secret
- Login to Azure Portal for the subscription which is enabled for sidecar use.
- Search for “Key Vault” in the Azure search box. Select Key Vaults from the result.

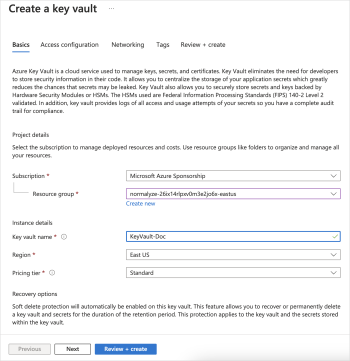
- Select Create New from the Key Vaults section.

- Search for the Resource Group related to the Azure account’s onboarding ID.

- Provide a Name for the Key Vault, set the Region to the required one, and set the Pricing Tier to Standard.
Note the region used in this step, it will be used later during the DSPM onboarding process.
Select Next.
- Select Next on the Access Configuration section. There are no changes required in this section.
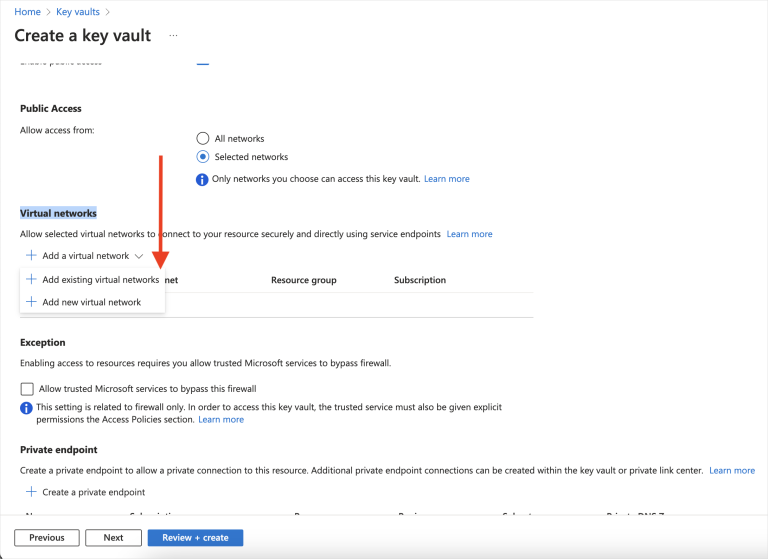
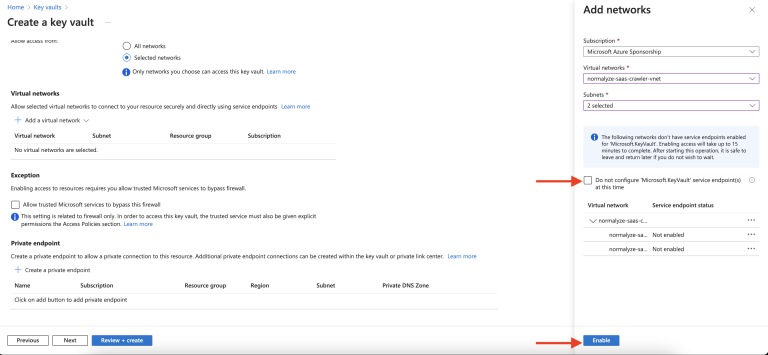
- In the Networking section select Selected Networks.
- Under Virtual Networks, in the Add a Virtual Network list, select Add existing virtual networks.
- In the right hand panel, in the Virtual Networks list, search for normalyze-saas.
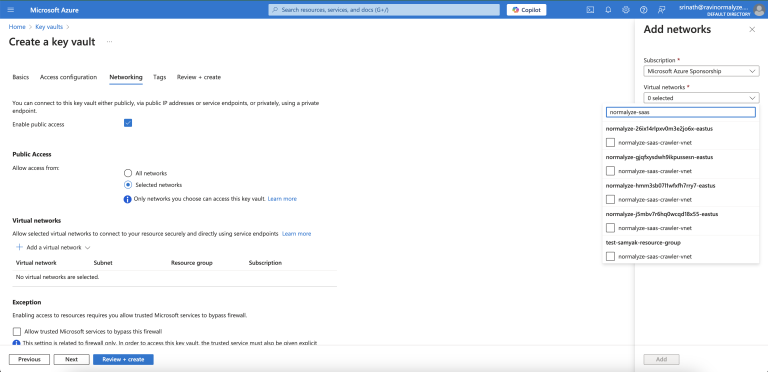
- Select the VNet with the name normalyze-saas-crawler-vnet that is shown under the resource group normalyze-<onboarding-id>-<region> for the DSPM account that you’re configuring.
- Once the VNet in the previous step is selected, the Subnets list will be populated. Select Select All from the list.
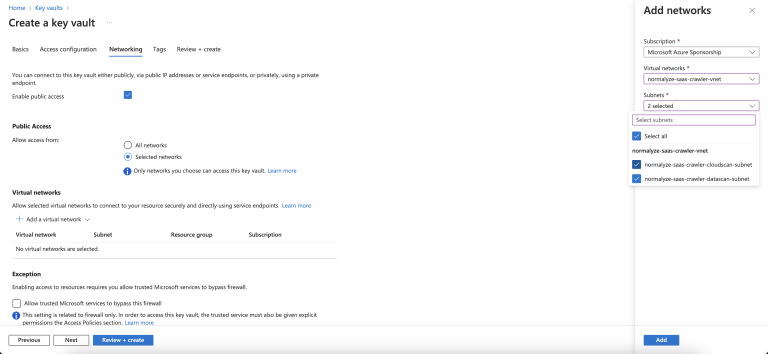
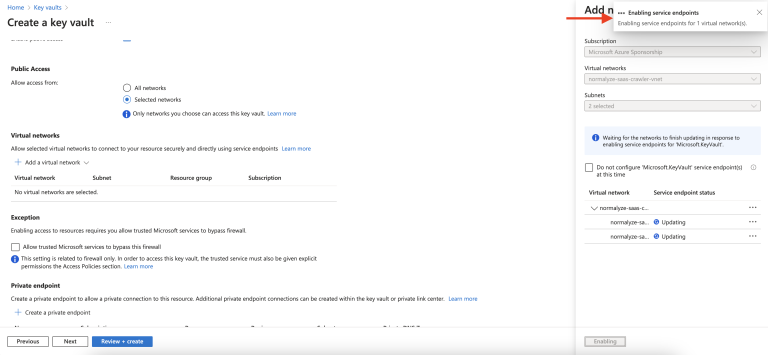
- Do not select the option Do not configure ‘Microsoft.KeyVault’ service endpoint(s) at this time. Select Enable.
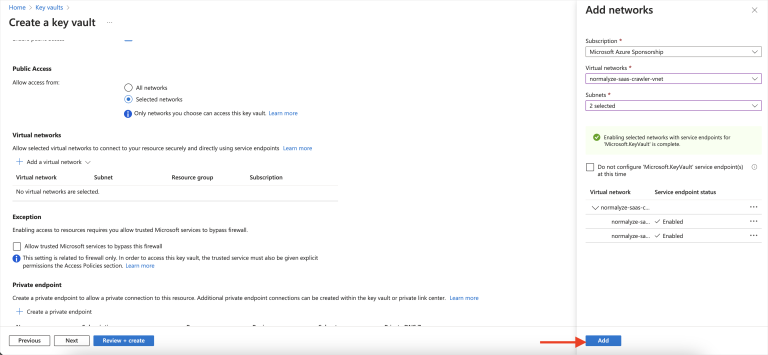
- After selecting Enable, the option will change to Add. Select the Add option.
- Scroll down to Exceptions. Select Allow trusted Microsoft services to bypass this firewall. Select Next.
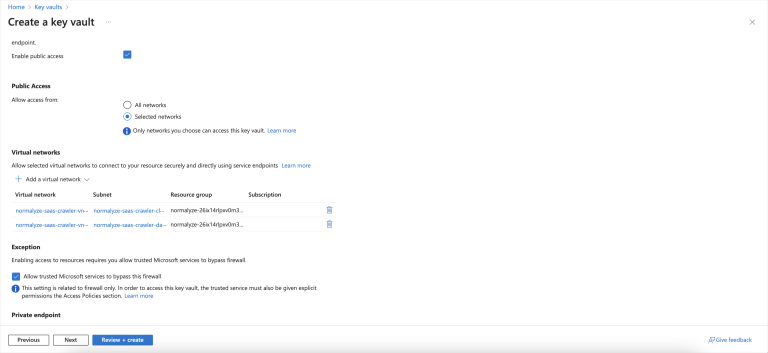
- Adding a Tag is optional. Select Next.
- Review the configuration detail. Once completed, select Create. Wait for the creation task to complete.
- Select the Key Vault created. From the left fireblade, select Settings > Networking.
- Under Firewall, select + beside Add your Client IP Address.
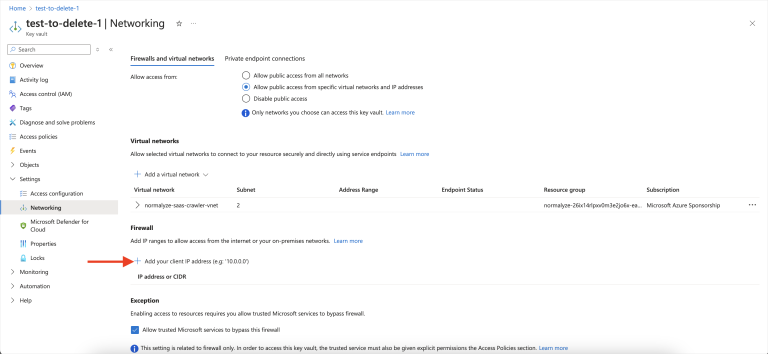
- In the field under IP Address or CIDR, add the list of IPs/CIDR that would be allowed to access the Key Vault in addition to the subnets added in the earlier steps.
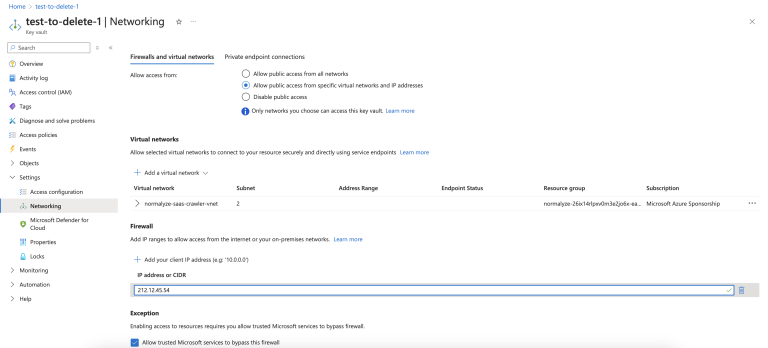
- Select Apply to persist the changes.
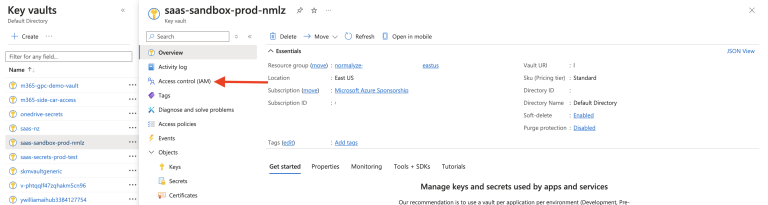
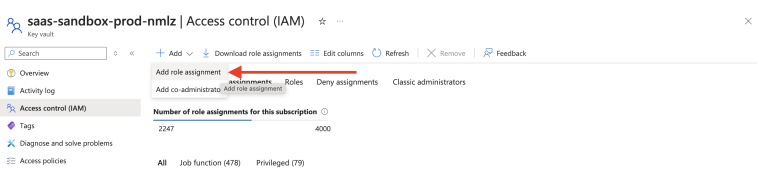
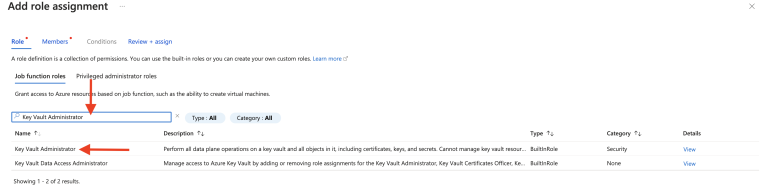
- Select the Key Vault created. From the left fireblade, select Access control (IAM) and then select the Role assignments tab.
- Click the + Add list and select Add role assignment.
- Search for the Key Vault Administrator option and select it (it will be highlighted). Click Next.
-
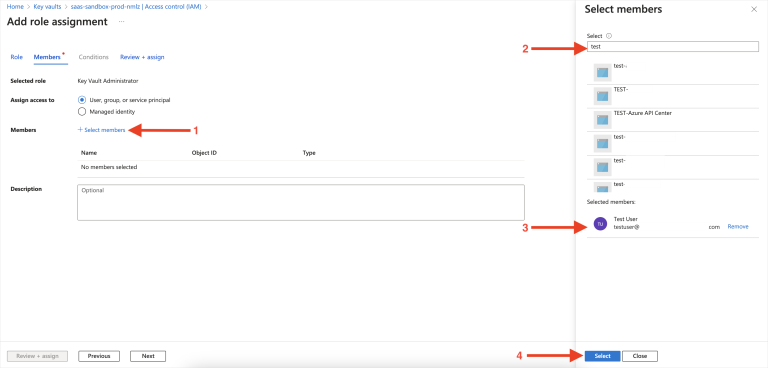
Under Members, click Select members (1).
Select the user who created the Key Vault (2 and 3).
Click Select (4).
- Click Review + assign. This will assign the “Key Vault Administrator” role to the user.
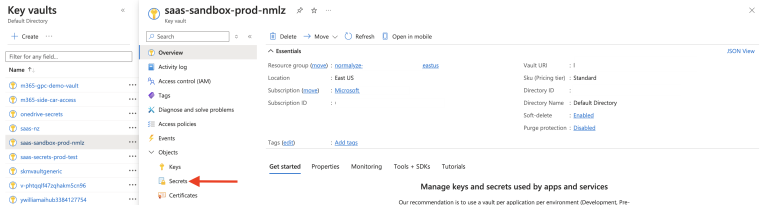
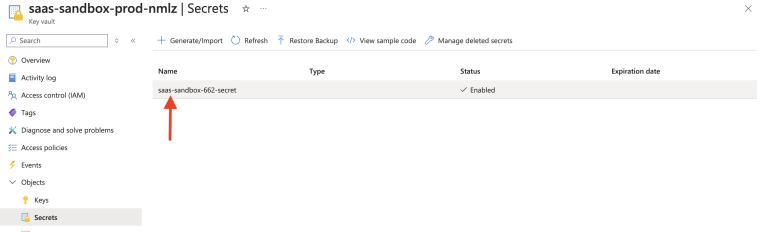
- Select the Key Vault created in Step 9. From the left fireblade, select Secrets, then select Generate/Import.
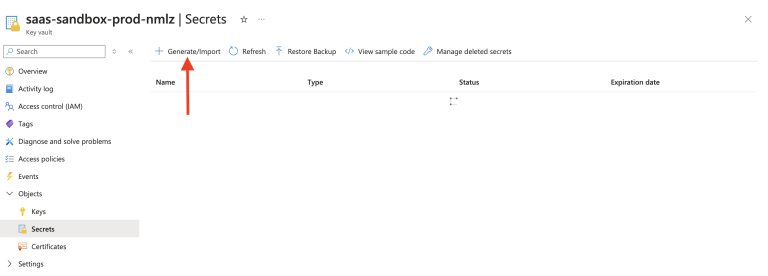
- Enter the following information:
- Name: Provide the name for the Secret as per the naming convention used for other entities.
- Secret Value: Input the value you saved in step 3 of Configure Azure Key Vault Secret > Prerequisites. Copy the entire value, including the braces, and paste it in this field.
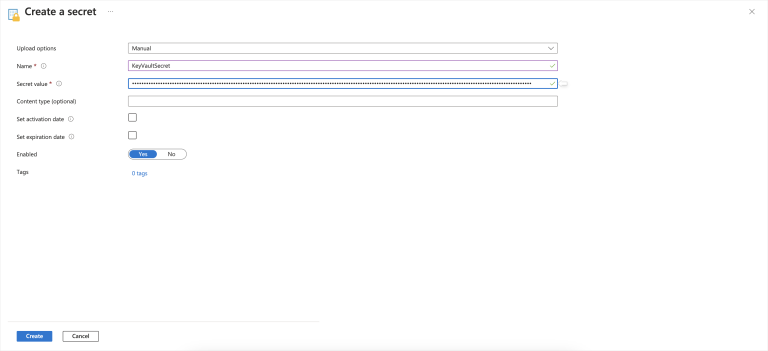
- Leave the rest of the values/options as default. Click Create.
- Once the secret is created, select it and click the value listed in the Current Version column.
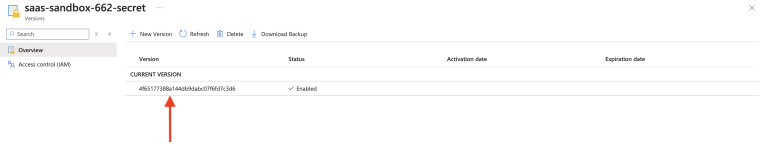
- Copy the URL for the Secret Identifier column. You will use this value later in the DSPM onboarding process.

Step 3. Onboard SharePoint, OneDrive, or Teams to DSPM
The following steps must be completed for Microsoft SharePoint, Microsoft OneDrive, and Microsoft Teams.
- In DSPM, go to Workspaces > Accounts.
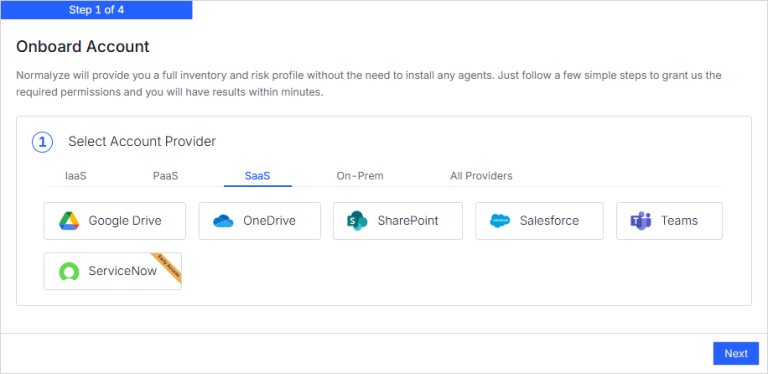
- Click Onboard Account.
- Select SharePoint, OneDrive, or Teams.
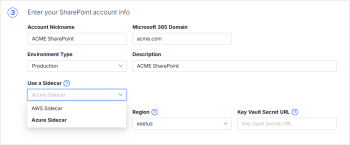
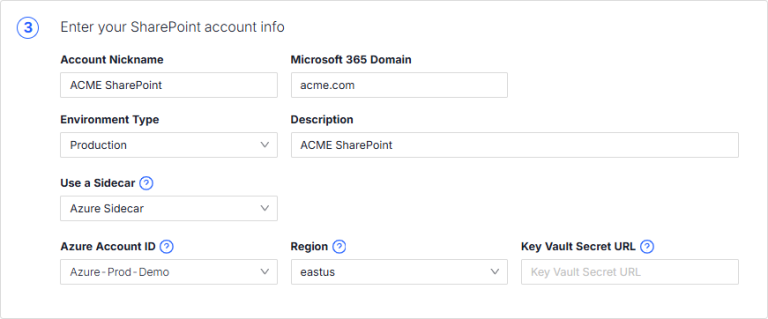
- Provide the following details for the SharePoint, OneDrive or Teams application.
- Account Nickname: Provide an identifiable name for the account. This name displayed on the DSPM UI for the SharePoint account, OneDrive account or Teams account.
- Microsoft 365 Domain: Enter the domain URL for the SharePoint, OneDrive, or Teams account. This URL will be used to connect from DSPM.
- Environment Type: Select the environment.
- Description: Enter a description for the account.
- Use a Sidecar: Select the provider to use as a sidecar (AWS Sidecar or Azure Sidecar).
- Provide details for the sidecar provider.
- If you selected Azure Sidecar, provide the following information:
- Azure Account ID: Select the Azure account you configured as a sidecar in Azure as Sidecar.
- Region: Select the region where the Key Vault was created on the Azure subscription. To view the region, see step 2 in Configure Azure Key Vault Secret > Prerequisites.
- Key Vault Secret URL: Paste the Secret URL you copied in the last step of Add Azure App Credentials to Azure Key Vault Secret.
- If you selected AWS Sidecar, paste the Secret ARN (from Add Azure App Credentials to AWS Secrets Manager) in the Secret ARN field.
The Account ID and the Region fields will be populated based on the secret ARN.

- If you selected Azure Sidecar, provide the following information:
- Click Next to finish onboarding!