The on-premises data scanner supports scanning data stores within your on-premises environment.
Deployment Prerequisites
The on-premises data scanner is deployed as a Docker Container.
System Requirements
- Linux server/Virtual Machine ( on-premises or cloud-based)
- x86_64 based architecture
- Minimum system resources of 8 CPUs and 32 GB of memory
- Minimum 50GB of available disk space available
- Docker v24.0 or higher installed
- Port 443 outbound access to the URLs listed in Onboarding Prerequisites.
Onboarding using the Containerized Scanner
-
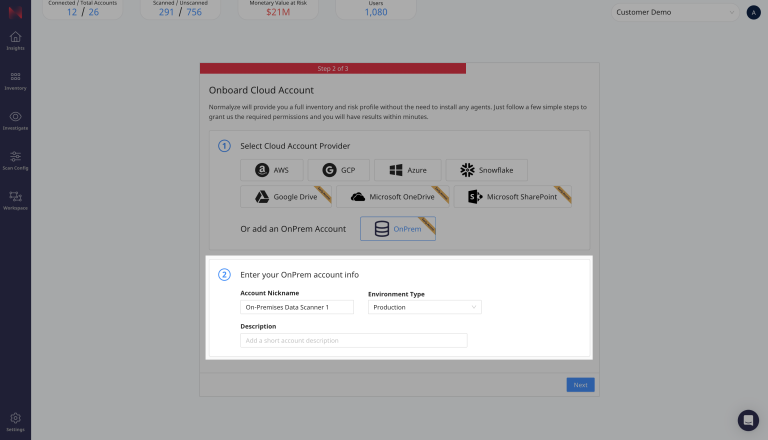
Go to Workspace, then Accounts and select On-Premises.

-
Enter your Account Details
Give your account a nickname, select the environment type, and add a description, then select Next
-
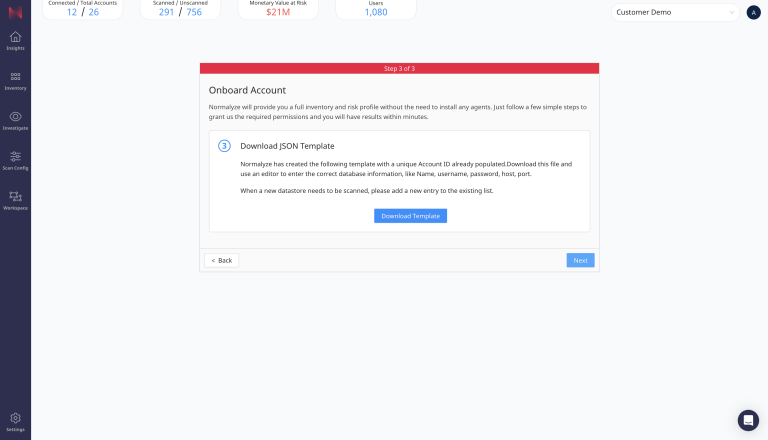
Download the JSON Template
Select the blue button to download the Scan Target Configuration template in JSON to your computer, then select Next
-
Open the text file template that you have just downloaded and provide the values for the fields as indicated. Some of the fields are pre-filled, such as accountName, accountId, region and clusterName.
Of these 4 fields which are pre-filled, the following 2 can be updated:
region
clusterName[
{
"accountName": "Onprem Accounts",
"accountId": "OnpremAccounts-1bc29f4874",
"region": "onprem",
"clusterName": "cluster-1",
"dataStoreType": "<Supported datastore type, e.g. ONPREM-MYSQL|ONPREM-POSTGRES|ONPREM-ORACLEDB|ONPREM-WINDOWS-FILE-SHARE>",
"dataStoreName": "<Name of the datastore, unique within account>",
"host": "<Hostname or IP address of datastore>",
"port": "<Port Number of datastore>",
"user": "<User name to connect to datastore>",
"password": "<Password to connect to datastore>",
"defaultDatabaseName": "<Required only for dataStoreType ONPREM-ORACLEDB>",
"fileShareName": "<Required only for dataStoreType ONPREM-WINDOWS-FILE-SHARE>"
}
]If there are multiple on-premises databases that need to be scanned then template file can be updated with multiple blocks of data store information for each one of them respectively.
[
  {
    "accountName": "Onprem Accounts",
    "accountId": "OnpremAccounts-1bc29f4874",
    "region": "onprem",
    "clusterName": "cluster-1",
    "dataStoreType": "<Supported datastore type, e.g. ONPREM-MSSQL|ONPREM-MYSQL|ONPREM-POSTGRES|ONPREM-ORACLEDB|ONPREM-WINDOWS-FILE-SHARE>",
    "dataStoreName": "<Name of the datastore, unique within account>",
    "host": "<Hostname or IP address of datastore>",
    "port": "<Port Number of datastore>",
    "user": "<User name to connect to datastore>",
    "password": "<Password to connect to datastore>",
    "defaultDatabaseName": "<Required only for dataStoreType ONPREM-ORACLEDB>",
    "fileShareName": "<Required only for dataStoreType ONPREM-WINDOWS-FILE-SHARE>"
  },
  {
    "accountName": "Onprem Accounts",
    "accountId": "OnpremAccounts-1bc29f4874",
    "region": "onprem",
    "clusterName": "cluster-1",
    "dataStoreType": "<Supported datastore type, e.g. ONPREM-MSSQL|ONPREM-MYSQL|ONPREM-POSTGRES|ONPREM-ORACLEDB|ONPREM-WINDOWS-FILE-SHARE>",
    "dataStoreName": "<Name of the datastore, unique within account>",
    "host": "<Hostname or IP address of datastore>",
    "port": "<Port Number of datastore>",
    "user": "<User name to connect to datastore>",
    "password": "<Password to connect to datastore>",
    "defaultDatabaseName": "<Required only for dataStoreType ONPREM-ORACLEDB>",
    "fileShareName": "<Required only for dataStoreType ONPREM-WINDOWS-FILE-SHARE>"
  }
]
If Windows Fileshare is the data store that are going to be scanned then ensure to add inbound network rule that allows access over Port 445 on the VM or Host machine hosting the fileshare.
The below screenshot shows an example for the Rule created for Azure VM that is hosting the Windows fileshare.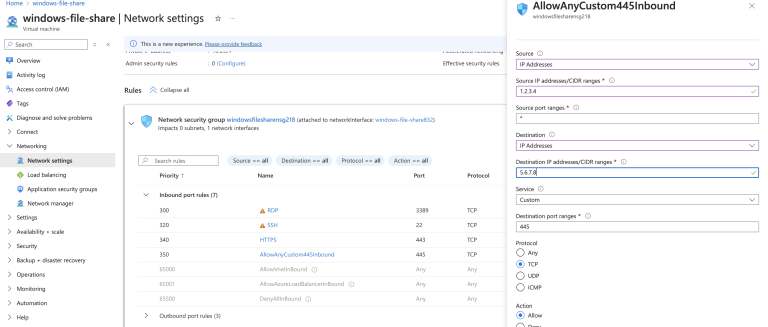
-
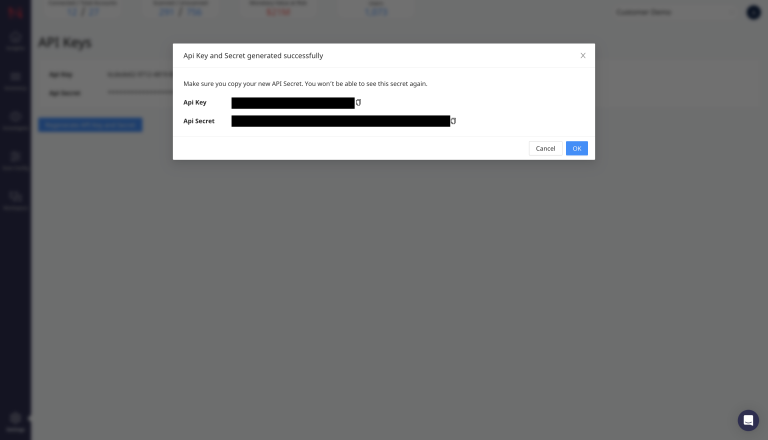
Generate API Credentials
Leave the current tab open, then open a new tab with DSPM in your browser. From there, go to Settings, then API Keys. Generate or Regenerate an API Key and Secret.
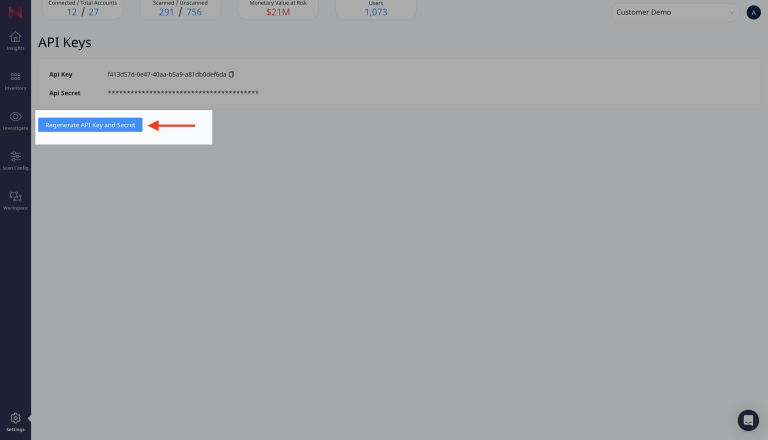
Copy and save both values as you will need to enter them in the Docker run command in the next step.
-
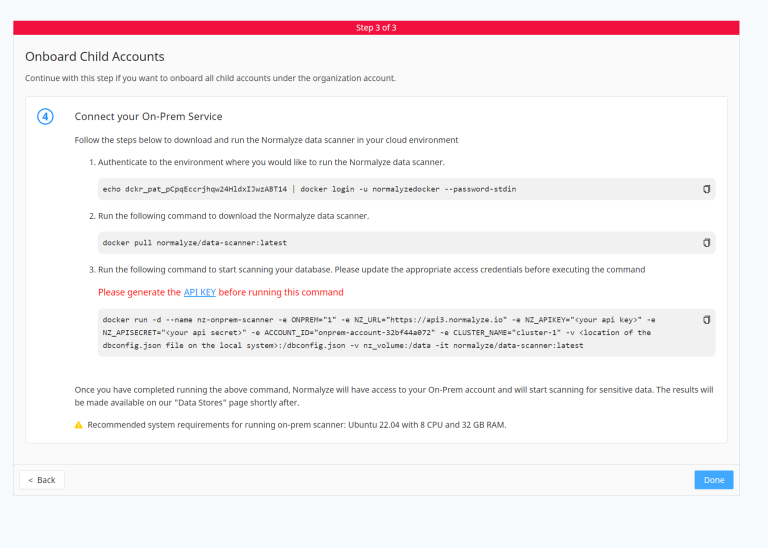
Deploy the On-Premises Data Scanner
On the server that you intend to deploy the on-premises data scanner, run the following commands that are provided in the onboarding UI.
Be sure to modify the Docker run command line with the required parameters prior to executing the command.
Return to the prior open tab in your browser. Select Done in DSPM only when all steps are complete.
-
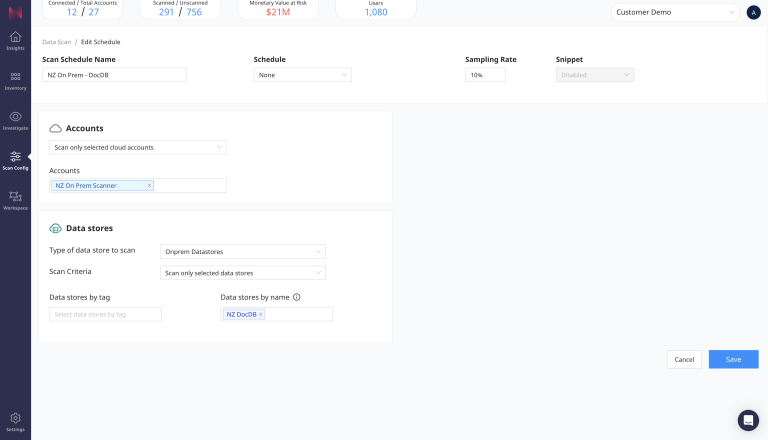
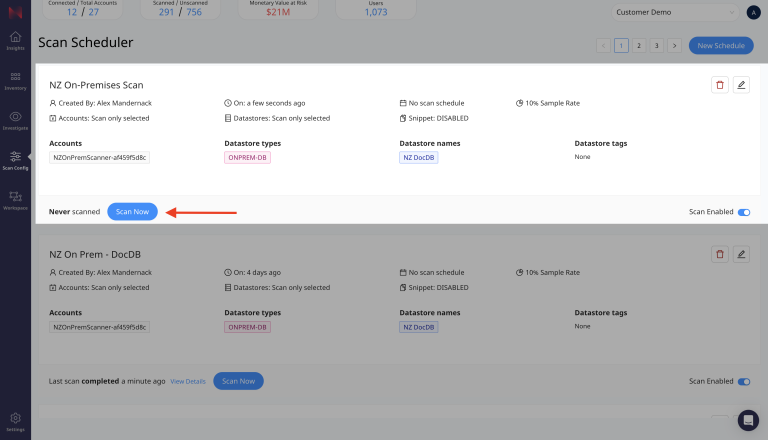
Create A New Data Scan Schedule
- Go to Scan Config and then select Scan Scheduler
- Select the New Schedule button
- In the Accounts section, choose Scan only selected cloud accounts
- Next, select the on-premises data scanner Account that you have just onboarded
- Then select Onprem Datastores as the type of data store to scan
- Finally select the data store name which you supplied in Step 4
- Optionally you can set a schedule for the scan to run or skip this
-
Select Save
-
Scan Now
Navigate to the Scan Scheduler page again, find the scan profile that you just created and select Scan Now. This will immediately start a data scan on the on-premises data store that you have specified.
-
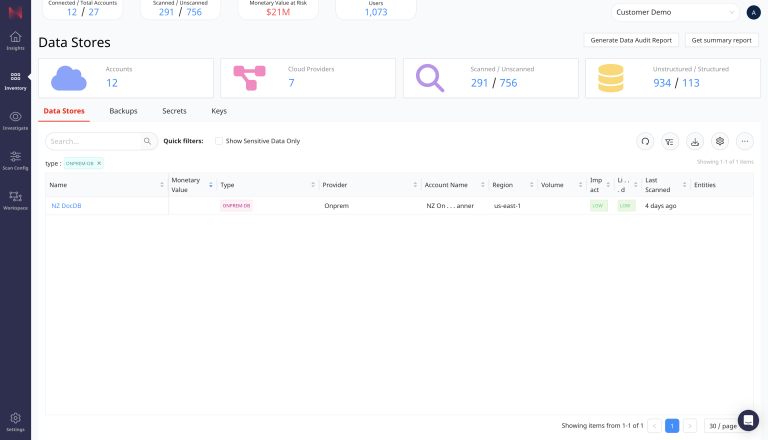
View the Results
Once the scan completes, navigate to the Data Stores Inventory page and enter into the search bar
type: ONPREM-DB. This will filter the results to just on-premises data stores. You can further filter by name or other values of your choosing.